We use cookies to enhance your experience on our website. By continuing to use our website, you are agreeing to our use of cookies. You can change your cookie settings at any time. Find out more

Get started on Oxford English Hub

In this section:

Access Oxford English Hub

Go to Oxford English Hub using the URL: https://go.oup.com/lms/org/register

Accessing Oxford English Hub using the above URL displays the option to create an ‘LTI-organization’ specifically for integration with an LMS. Administrators accessing the Hub from the usual URL will not see this option.

Register an Administrator account

Access the Oxford English Hub landing page using the above URL.

Choose Register today.

You will be taken to the registration page.

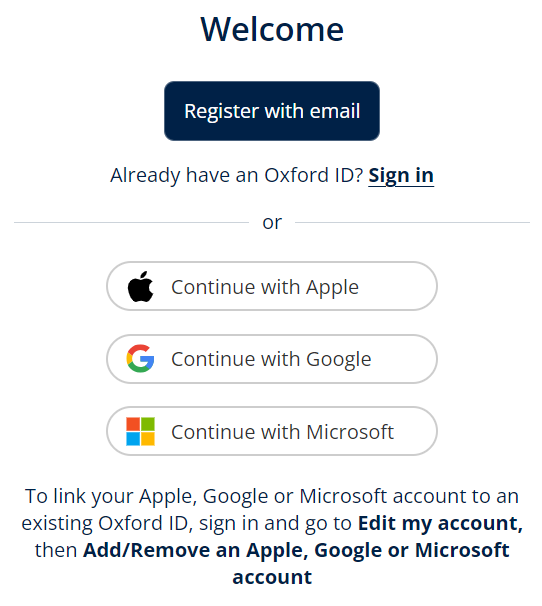
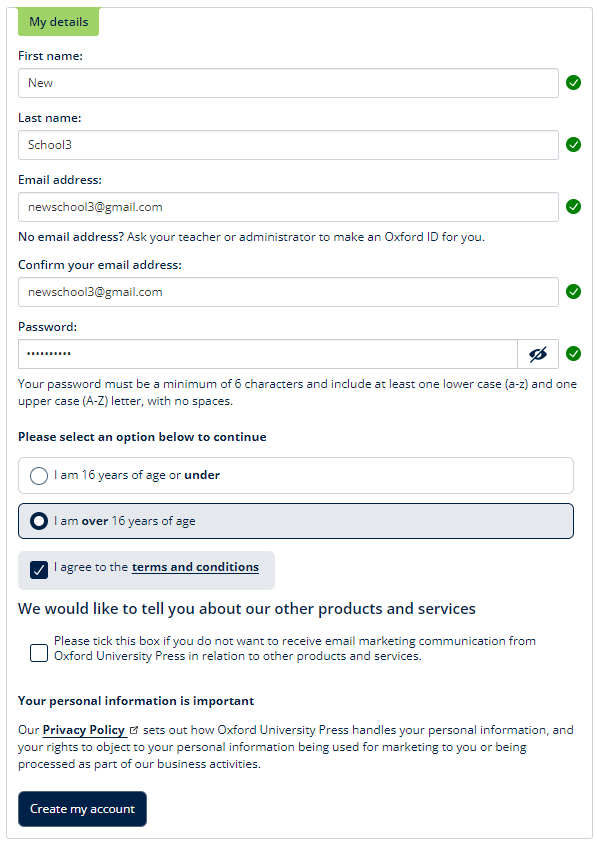
Choose Register with email or continue to register using your Apple, Google or Microsoft account.

Enter your

  • First name
  • Last name
  • Email address
  • Confirm your email address

Create a password.

Confirm your age group.

Agree to the Terms & Conditions.

Choose your contact preferences.

Choose Create my account.

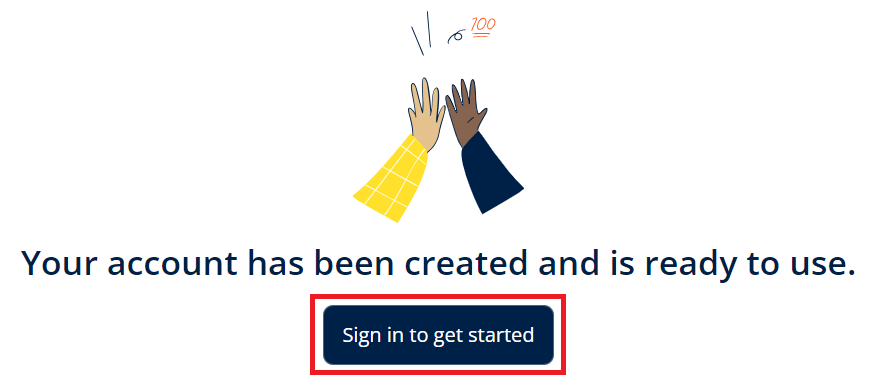
You will see confirmation that your account has been created.

Choose Sign in to get started.

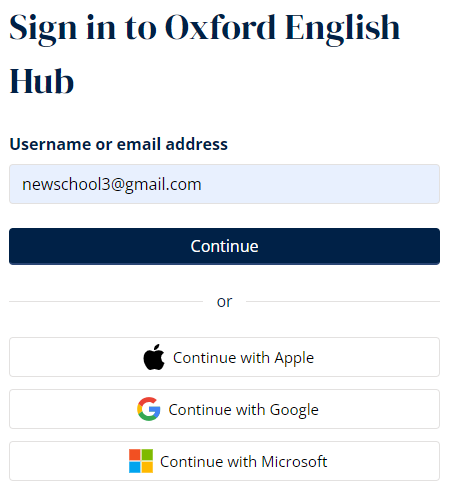
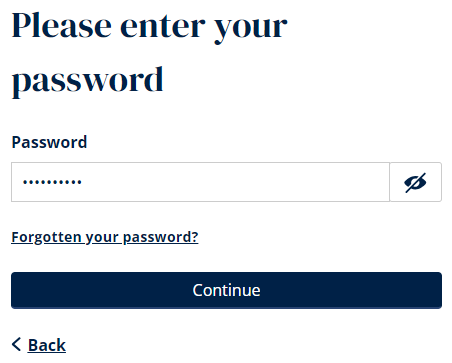
Sign in using your username or email address and password.

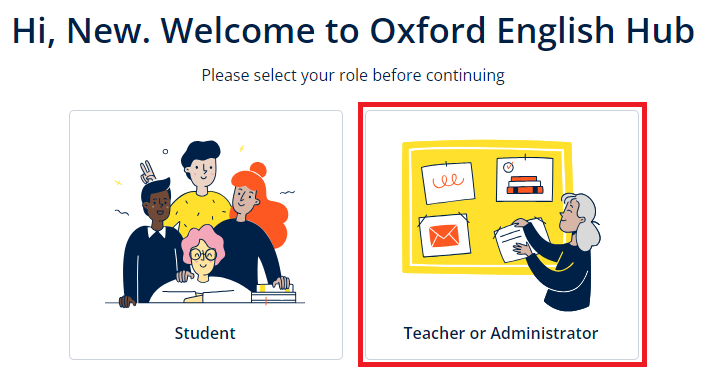
Choose Teacher or Administrator.

Register an LTI Organization

Within your Hub administrator account, you can register an organization. Within the organization, you can create and deploy an LTI tool to integrate Hub with your LMS.

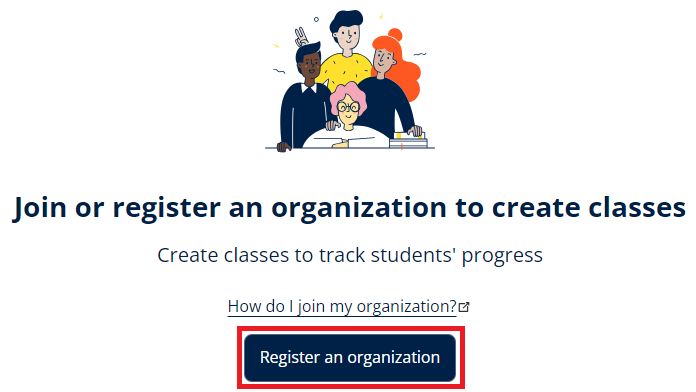
Choose Register an organization.

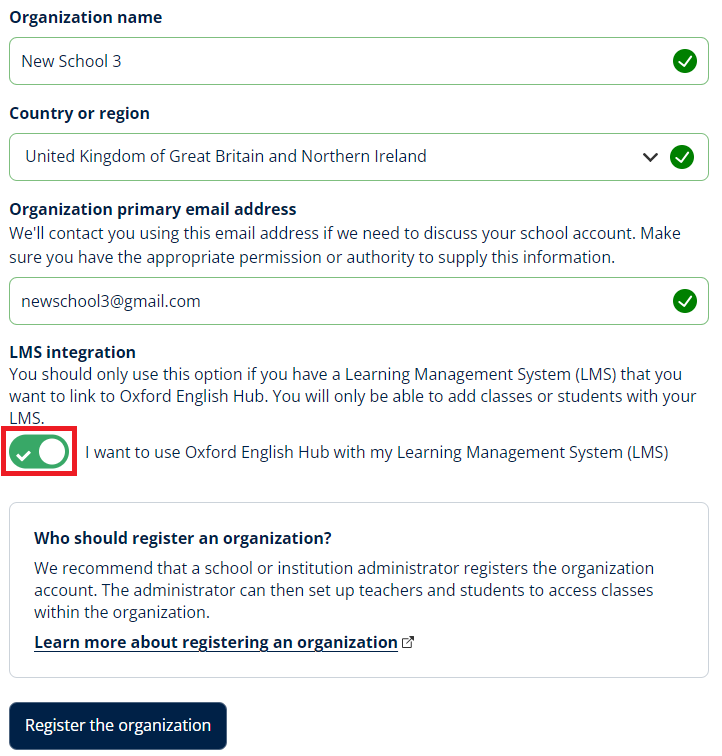
Enter the name of your organization.

Choose your country or region.

Enter the email address of your organization.

Ensure the LMS Integration option is selected / toggled on.

Choose Register the organization.

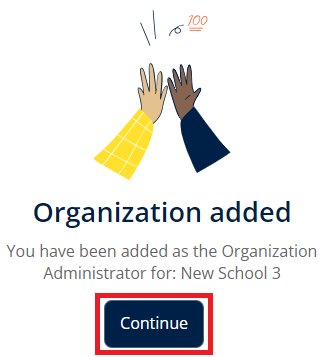
Your organization will be created and added to your account.

Choose Continue.

Create and Deploy Integration Tool

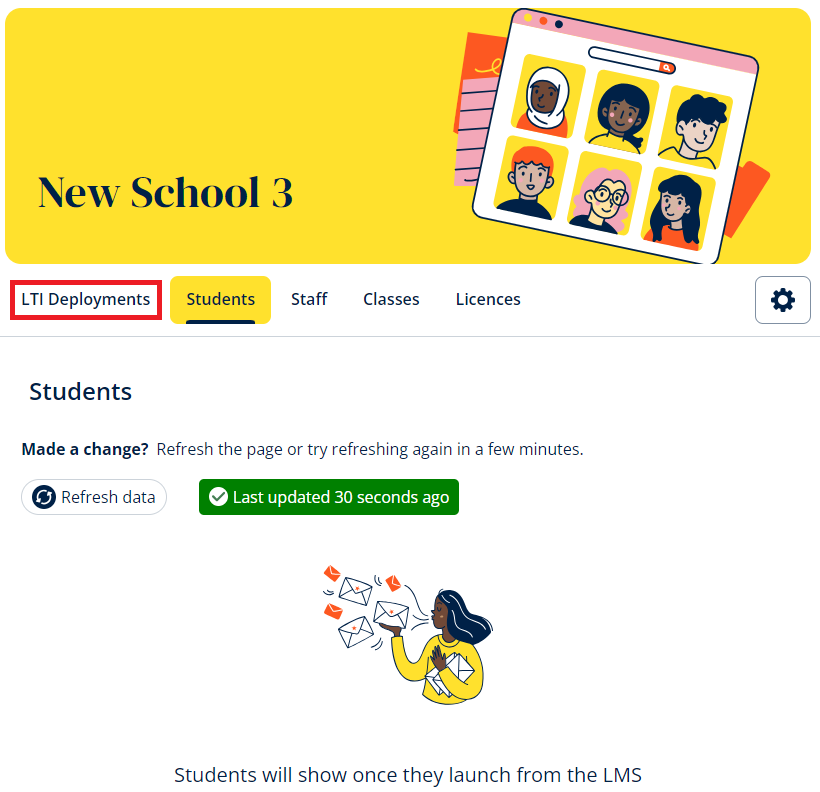
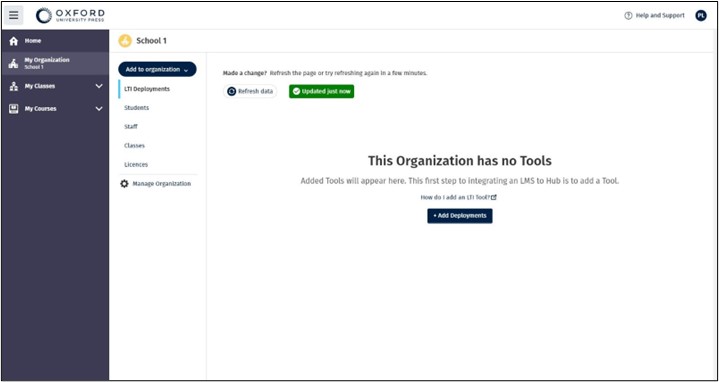
Choose LTI Deployments.

Choose Add deployments.

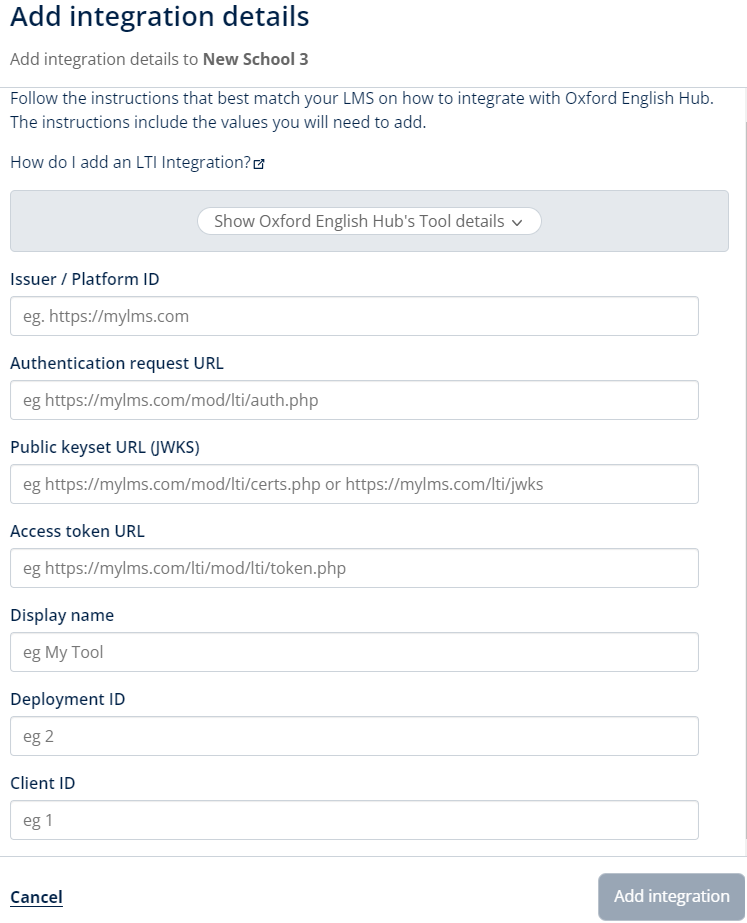
A registration side panel will display. You can copy values from your LMS and add them to the fields in the side panel. Full LMS-specific instructions for this are below.

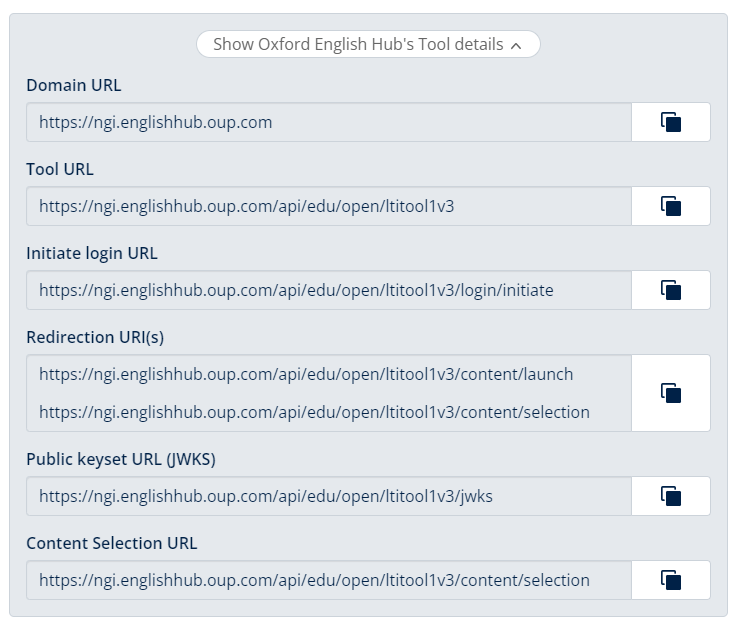
Choose Show Oxford English Hub’s Tool details to display the values that must be copied and added to your LMS to deploy the tool. Alternatively, you can copy these from the Help section for your LMS below.

Leave this panel open and ready while you access your LMS in a different tab or window.

You will need to move between the two to deploy an LTI tool and set up the integration between your Hub organization and your LMS.

Moodle

Add Hub Tool Values to LMS

You will need to access Oxford English Hub in one window and Moodle in another.

Within your Moodle administrator account, choose Site Administration > Plugins > Activity Modules > External tool > Manage Tools.

On the Manage tools page choose Configure a tool manually.

This will open the External tool configuration page.

Within Hub, choose Show Oxford English Hub’s Tool Details.

Copy and paste the tool values from the Oxford English Hub panel and paste into Moodle External tool configuration window as below. You can copy the URLs from Hub or from the text below.

  1. Tool name: Enter a name for the tool
  2. Tool URL: Copy the Tool URL and add to the field. https://ngi.englishhub.oup.com/api/edu/open/ltitool1v3
  3. Tool description: Enter a description of the tool and what it will be used for.
  4. LTI version: Choose LTI 1.3
  5. Client ID: This will be created automatically on saving.
  6. Public key type: Choose Keyset URL
  7. Public keyset: Copy the Public keyset URL (JWKS) and add to the field. https://ngi.englishhub.oup.com/api/edu/open/ltitool1v3/jwks
  8. Initiate login URL: Copy the Initiate login URL and add to the field. https://ngi.englishhub.oup.com/api/edu/open/ltitool1v3/login/initiate
  9. Copy the Redirection URI(s) and paste here. There are two. They can be separated with a space. https://ngi.englishhub.oup.com/api/edu/open/ltitool1v3/content/launch https://ngi.englishhub.oup.com/api/edu/open/ltitool1v3/content/selection
  10. Custom parameters: Optional – Add any specific customer parameters here. None are required by the Oxford English Hub tool.
  11. Tool configuration usage: We recommend Show as preconfigured tool when adding an external tool.
  12. Default launch container: We recommend New window.
  13. Supports Deep Linking (Content-Item Message): Check this box to ensure products can be launched.
  14. Content Selection URL: Copy the Content Selection URL and paste here. https://ngi.englishhub.oup.com/api/edu/open/ltitool1v3/content/selection

Choose Save changes.

The tool will now appear on the Manage tools page.

Add LMS Values to Tool in Hub

Choose the configuration menu icon in the tool panel on the Moodle Manage tools page.

Choosing this icon will display the menu showing the Moodle values that must be copied and added to the OEH tool.

Copy the values from Moodle and add them to the Hub tool as below.

  1. Issuer / Platform ID: Copy the Platform ID value from Moodle and paste into the Hub field.
  2. Authentication request URL: Copy the Authentication request URL value from Moodle and paste into the Hub field.
  3. Public keyset URL (JWKS): Copy the Public keyset URL value from Moodle and paste into the Hub field.
  4. Access token URL: Copy the Access token URL value from Moodle and paste into the Hub field.
  5. Display name: Add a name for the tool.
  6. Deployment ID: Copy the Deployment ID value from Moodle and paste into the Hub field.
  7. Client ID: Copy the Client ID value from Moodle and paste into the Hub field.

When all values have been added to the OEH tool from Moodle, choose Add Integration.

The tool creation and deployment is now complete.

Choose Close to exit to your deployments page.

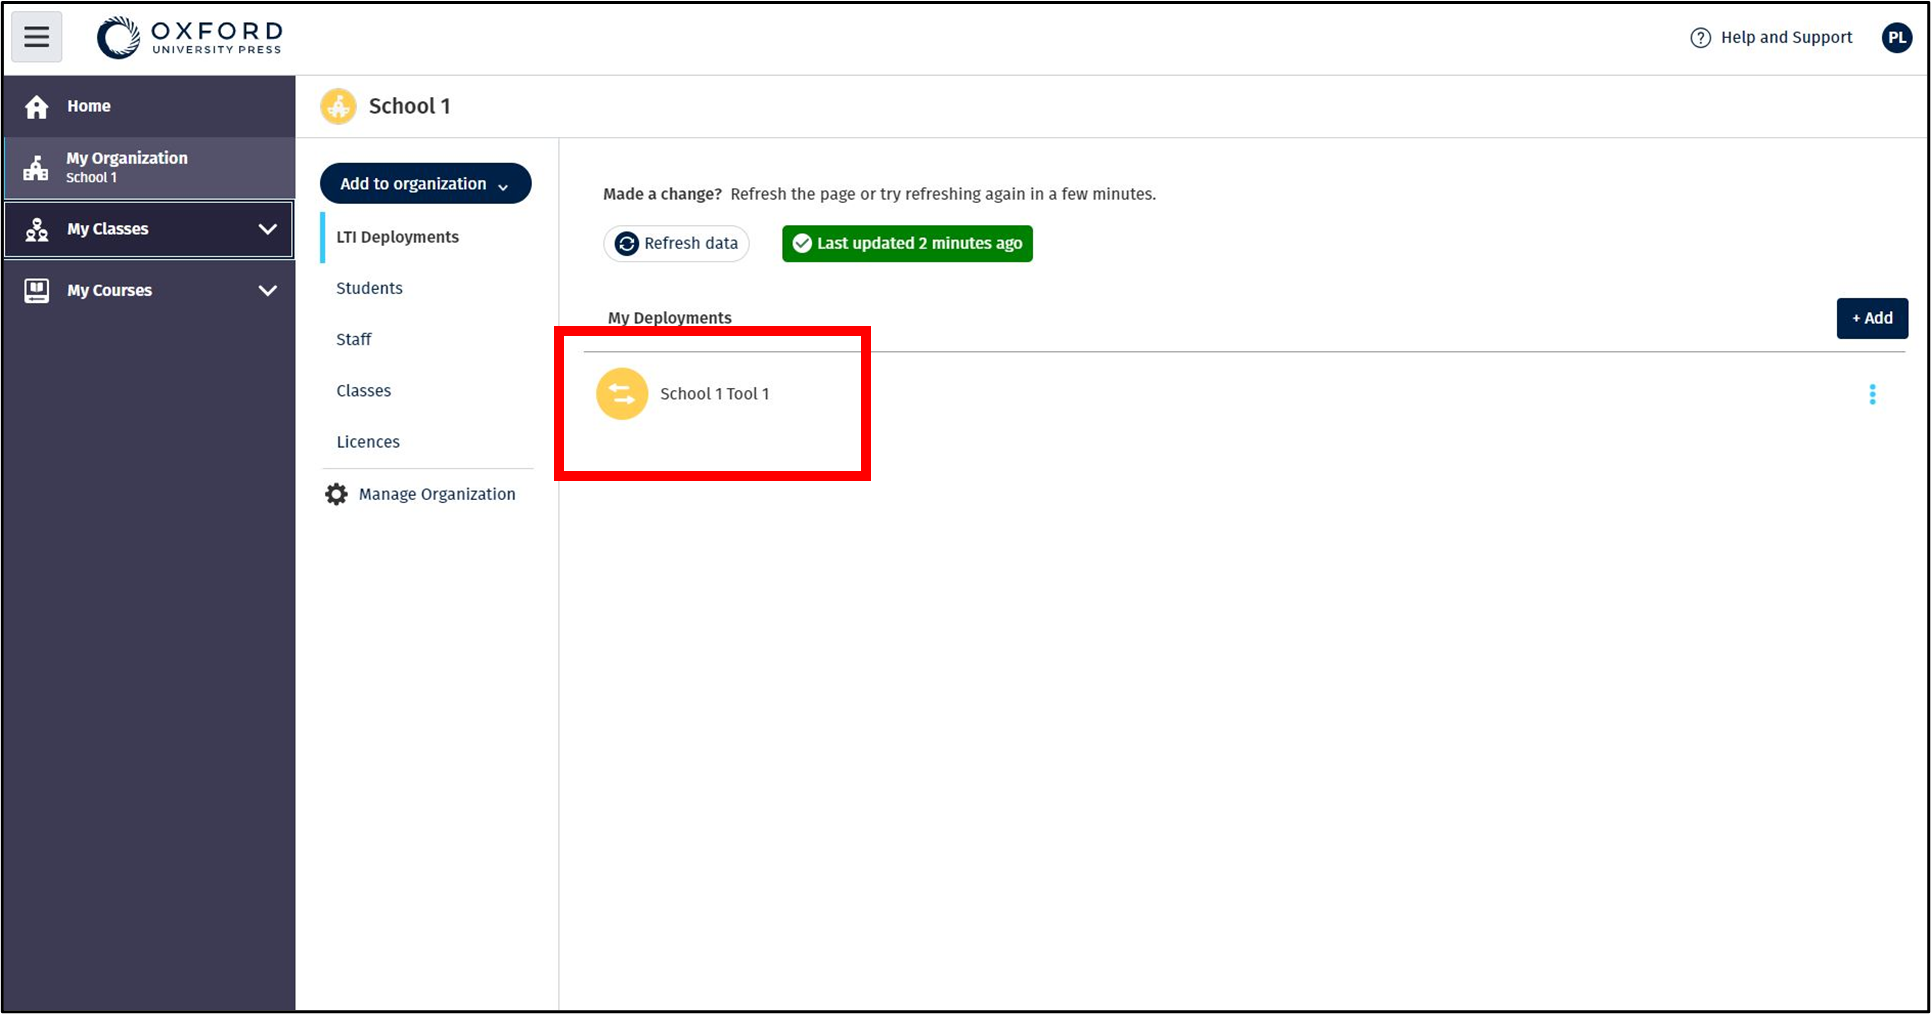
The deployment is now visible on the LTI deployments page.

Assign Tool to LMS Course

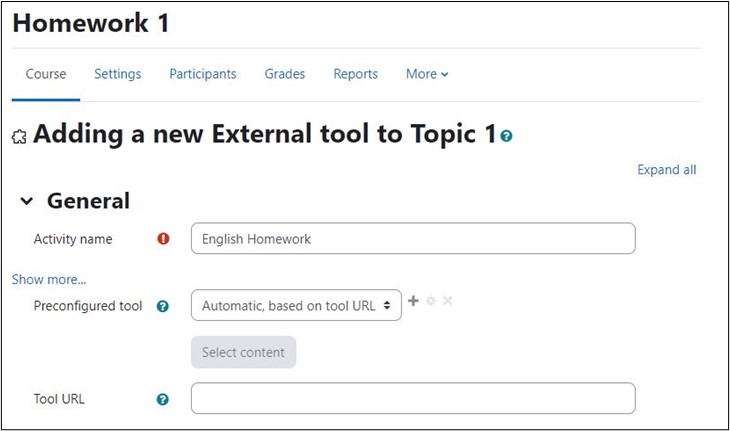
Within your course in Moodle in edit mode choose Add an activity or resource.

Choose External Tool from the menu.

Activity name: Provide a name for the activity.

Preconfigured tool: Choose the tool you have deployed in the dropdown menu.

Tool URL will fill automatically after you have selected you OUP product.

Assign Products

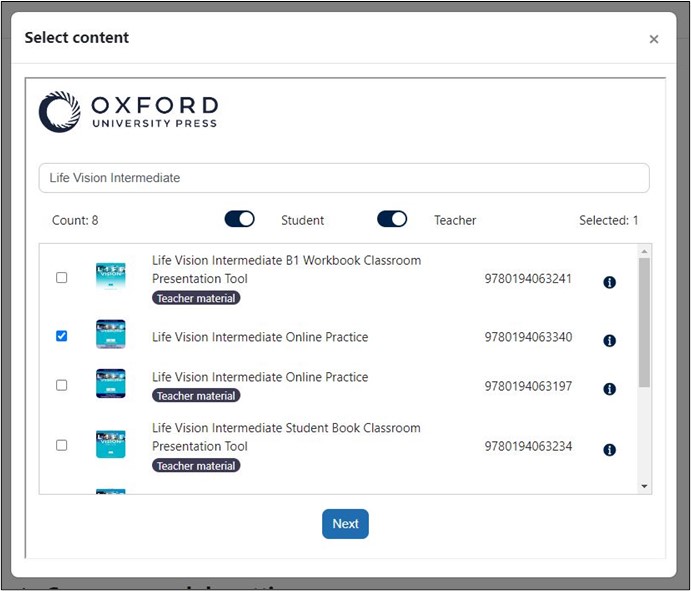
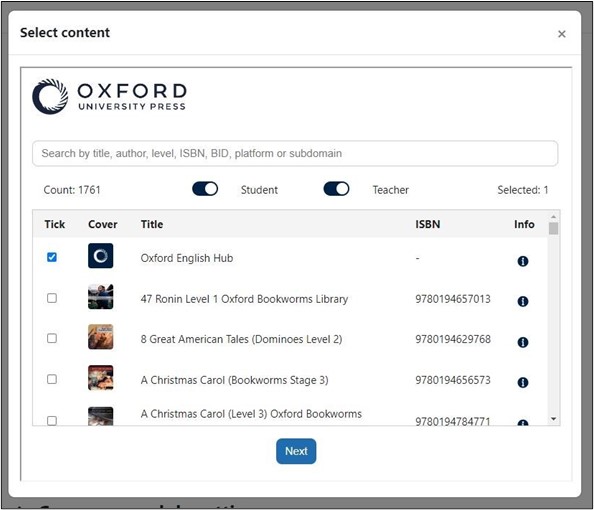
In the same menu choose Select content.

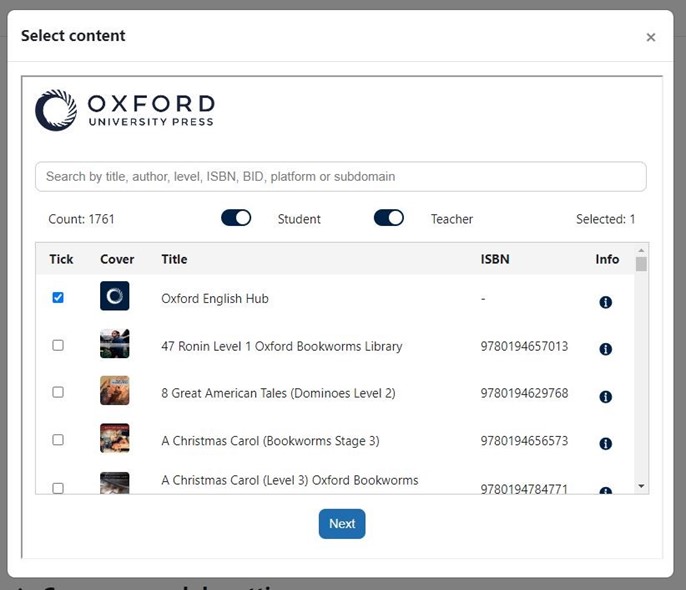
A content selection menu will display.

Search within the menu for the product you wish to assign to the LMS course.

When you have selected your course pack or product choose Next.

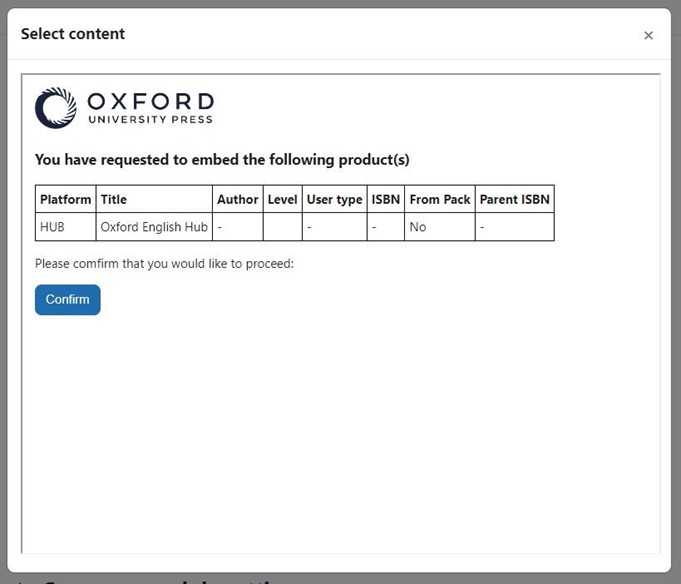
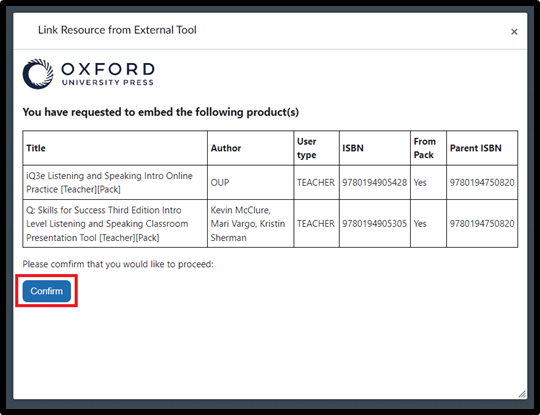
Check that you have chosen the correct product and user type (student or teacher) and choose Confirm.

The Tool URL will fill automatically based on your chosen product.

Choose Save and return to course.

Your chosen product is now available in your LMS course for teachers and students to access.

Important:

You can choose individual products e.g. e-book, Online Practice, or a pack of products if available.

Pack access codes are required for a course pack. Individual products have their own access code if used individually.

Student and teacher products also have different access codes for the same product.

Launch Products

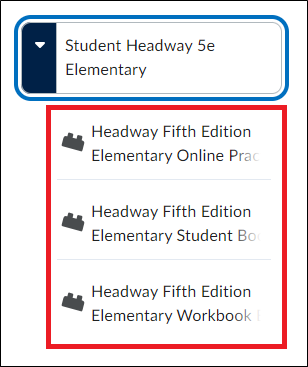
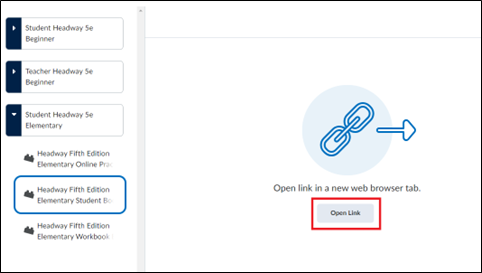
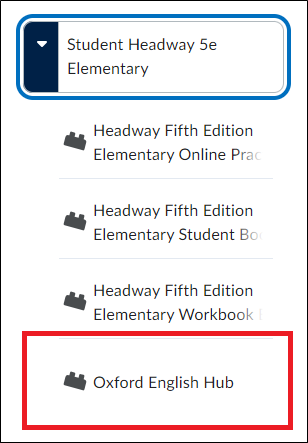
When a student accesses their course in the LMS they will see the OUP product LTI launch link.

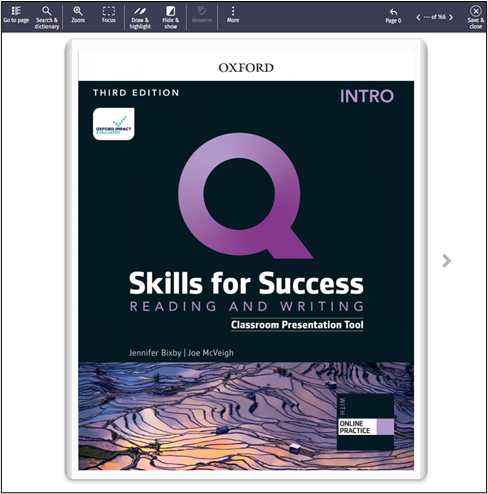
Clicking on the launch link will open the OUP product.

If you have created a licence pool in your Oxford English Hub organisation, the student will open their product and a licence will automatically be redeemed from the pool.

(The teacher or student may have to accept Terms & Conditions on first launch.)

If you have not created a licence pool, or the licence pool is empty, the student or teacher will be prompted to enter an access code to be able to use the product.

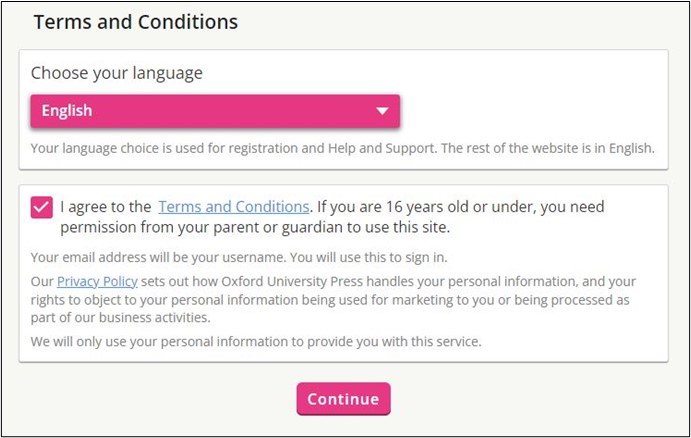
They should enter their access code and choose Continue.

The product will launch.

They should check the box agreeing to the Terms and Conditions and choose Continue.

They will then be able to use the product.

Assign Hub

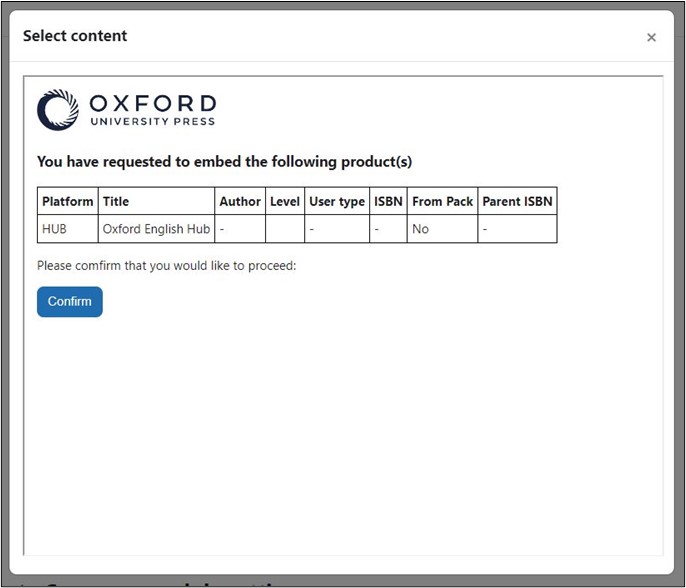
In the content selection menu, choose Oxford English Hub to create a launch link in your course.

Choose Next.

Choose Confirm.

Choose Save and return to course.

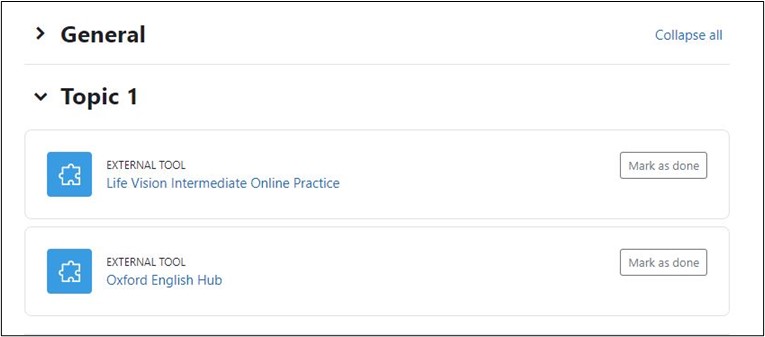
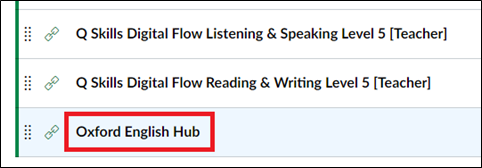
A launch link for Oxford English Hub will be created in your LMS course.

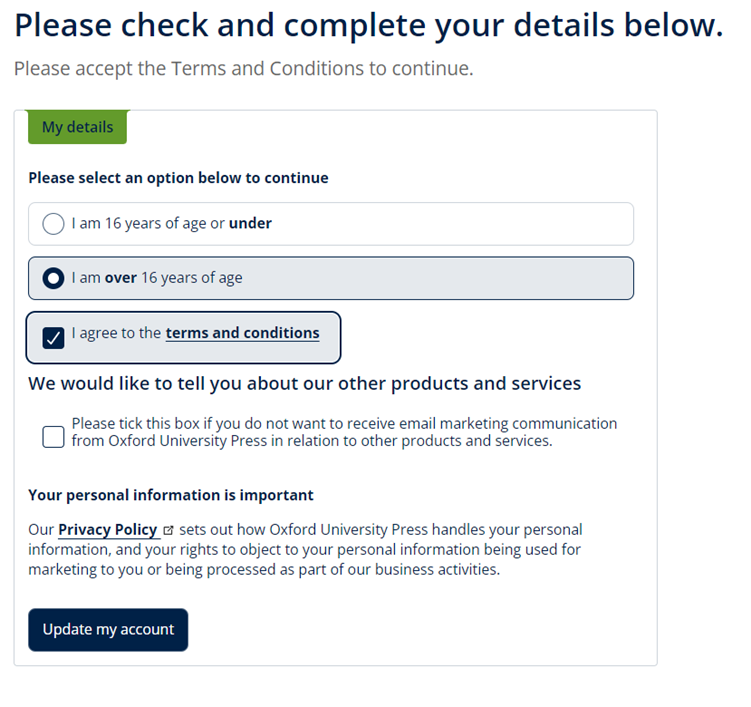
When a teacher or student launches the Oxford English Hub will they will be presented with the Terms and Conditions.

They should make their age choice and agree to the Terms and Conditions.

Then choose Update my account.

The user’s account will be created in the Oxford English Hub.

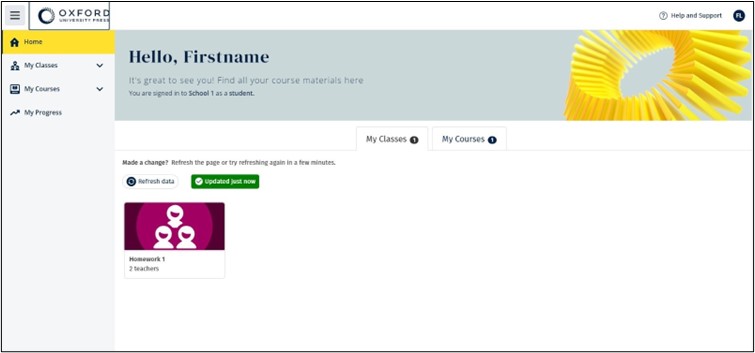
They can choose Get started to access the Oxford English Hub.

Within the Hub, students and teachers will be able to access the course content they are entitled to such as course Resources as Assessment material depending on their product.

They will also be able to access e-book, Online Practice and Assessment gradebooks.

Important:

If a student has not redeemed a licence for a product they will not see any course material in the Hub.

If a student has redeemed a pack licence already they will see the pack course materials available within the Hub.

If a student has redeemed an Online Practice licence they will be able to access course Resources in the Hub.

Students and teachers cannot launch Online Practice, e-books or Class Presentation Tools from the Hub. These products must be launched using their own launch link from the LMS.

Students and teachers can only access the Hub from their LMS. They cannot access their account or course material by signing in to the Hub directly.

D2L Brightspace

Add Hub Links to Brightspace / Connect Provider

From the Brightspace homepage, choose the Admin Tools icon.

Choose Manage Extensibility.

Choose the LTI Advantage tab.

Choose Register Tool.

Select Standard.

Add the settings and URLs as below.

  1. Enabled: Toggle on
  2. Name: Add a name for your tool.
  3. Description: (Optional) Add a description.
  4. Domain: Add the URL
    https://englishhub.oup.com/
  5. Redirect URLs: Add the URLs
    https://ngi.englishhub.oup.com/api/edu/open/ltitool1v3/content/launch
    https://ngi.englishhub.oup.com/api/edu/open/ltitool1v3/content/selection
  6. OpenID Connect Login URL: Add the URL
    https://ngi.englishhub.oup.com/api/edu/open/ltitool1v3/login/initiate
  7. Target Link URI: Add the URL
    https://ngi.englishhub.oup.com/api/edu/open/ltitool1v3
  8. Keyset URL: Add the URL
    https://ngi.englishhub.oup.com/api/edu/open/ltitool1v3/jwks
  9. Extensions: Check all boxes
  10. Roles: Check box

Choose Register

Brightspace will generate registration details that can be added to the Oxford English Hub organization later.

Create Deployment / Choose Course

Choose View Deployments.

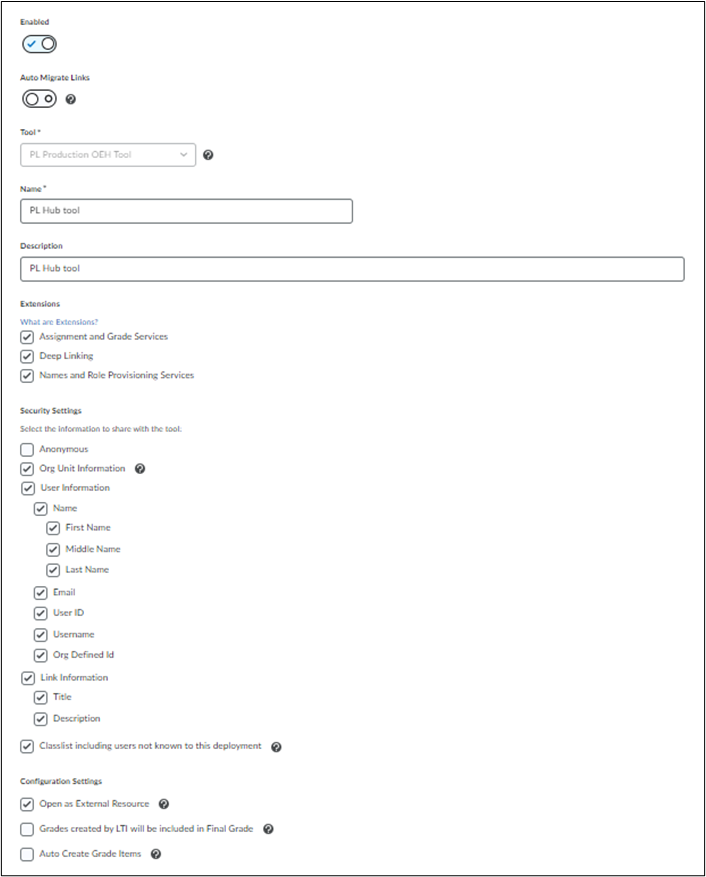
Choose New Deployment.
Add a name for the deployment.

Extensions
Check all

Security settings
Check all except Anonymous. We recommend not anonymising user data where possible as it is makes use of functionality such as gradebook more difficult.

Configuration setting
Choose Open as External Resource. Opening the Tool within an iFrame can lead to issues occurring on some devices and browsers.

Choose Add Org Units.
Search for your course.

Check the box next to the name of your course.
Choose Add.

Brightspace will generate a deployment ID. This will be added to the Oxford English Hub organization later.

Create Tool Link / Create Link to Content Selection Menu

Choose View links.

Choose New link.

Enabled
Toggle on

URL
Add the URL
https://ngi.englishhub.oup.com/api/edu/open/ltitool1v3/content/selection

Type
Choose Deep Linking Quicklink.
Choose Save and close.

Add Registration Details and Deployment ID from Brightspace to Hub

Open the tool you have created in Brightspace, copy the Brightspace registration details, and add them to the Hub organization.

Issuer / Platform ID
Add the Issuer URL.

Authentication Request URL
Add the OpenID Connect Authentication Endpoint URL.

Public Keyset URL (JWKS)
Add the Brightspace keyset URL.

Access Token URL
Add the Brightspace OAuth2 Access Token URL.

Display name
Add the name of the tool from Brightspace.

Deployment ID
Choose View Deployments in the Brightspace tool.
Open the deployment.
Copy the Deployment ID.
Add to Deployment ID in Hub.

Client ID
Add the Client ID from the Brightspace registration details.

Choose Add integration.

Assign Products

Within your Brightspace course, from the course Homepage choose Content then + New Unit.

Give the unit a name and choose Save and close.

Choose Add Existing.

Choose More.

Choose the tool link you created earlier.

The OUP content selection menu will open.

Search for the OUP product you wish to assign to your LMS course.

Check the box next to the product or pack title and choose Next.

Confirm that the product(s) are correct and choose Confirm.

The product launch links will display in your course.

Launch Products

Students will see the product launch link in the Canvas course when you have published the module.

To launch a product yourself as a teacher or administrator, it must be a teacher product and not a student product.

The product will launch in a new tab.

If you have not created a licence pool, the student will be prompted to enter an access code to be able to use the product.

The student should enter their access code and choose Redeem.

The product will launch.

The student should check the box agreeing to the Terms and Conditions and choose Continue.

The student will then be able to use the product.

Assign Hub

In the content selection menu, choose Oxford English Hub to create a launch link in your course.

Choose Next.

Choose Confirm.

Choose Save and return to course.

A launch link for Oxford English Hub will be created in your LMS course.

When a student chooses the link, Oxford English Hub will open and they will be presented with the Terms and Conditions.

They should make their age choice and agree to the Terms and Conditions.

Then choose Update my account.

The student’s account will be created in Oxford English Hub.

They can choose Get started to access Oxford English Hub.

Within Oxford English Hub students and teachers will be able to access the course content they are entitled to, such as course resources and assessment material, depending on their product.

They will also be able to access e-book, Online Practice, and assessment gradebooks.

Important:

If a student has not redeemed a licence for a product, they will not see any course material in Oxford English Hub.

If a student has redeemed a pack licence already, they will see the pack course materials available within Oxford English Hub.

If a student has redeemed an Online Practice licence, they will be able to access course resources in Oxford English Hub.

Students and teachers cannot launch Online Practice, e-books, or Class Presentation Tools from Oxford English Hub. These products must be launched using their own launch link from the LMS.

Students and teachers can only access Oxford English Hub from their LMS. They cannot access their account or course material by signing in to Oxford English Hub directly.

Canvas

Create Integration Key in Canvas

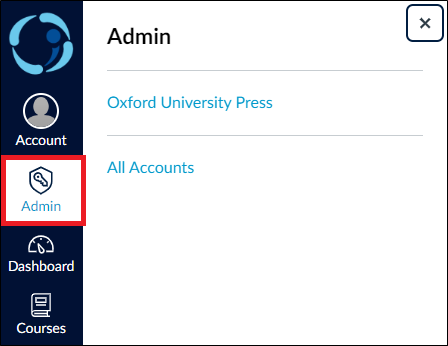
In your Canvas LMS, choose Admin in the Global Navigation bar.

Choose the name of your account.

Choose Developer Keys in the Admin navigation menu.

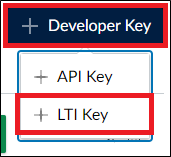
Choose Add Developer Key.

Then choose Add LTI Key.

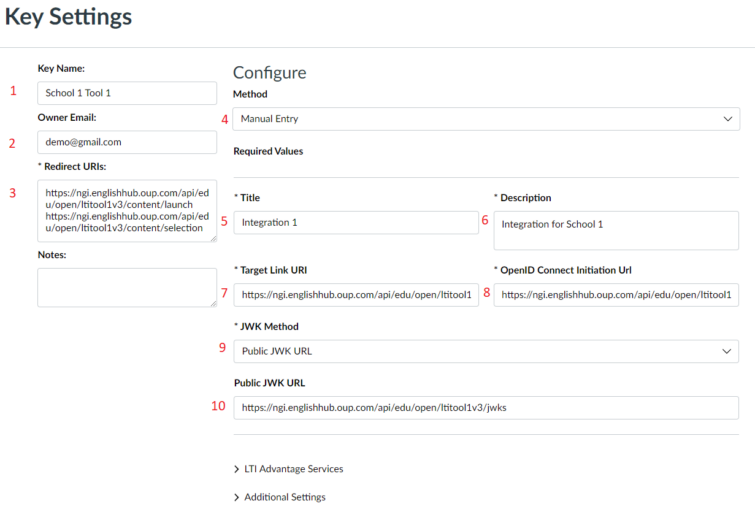
You will see the Key Settings window.

In the Key Settings window, add the following information.

  1. Key name: Add a name for your integration key.
  2. Owner email: Add your email address.
  3. Redirection URI(s): Copy both of these URLs and add them:
    https://ngi.englishhub.oup.com/api/edu/open/ltitool1v3/content/selection
    https://ngi.englishhub.oup.com/api/edu/open/ltitool1v3/content/launch

  4. Method dropdown menu: Select Manual Entry from the Method dropdown menu.
  5. Title: Add a title.
  6. Description: Add a description of the key and what it will be used for.
  7. Target Link URI: Copy the URL and add to the field: https://ngi.englishhub.oup.com/api/edu/open/ltitool1v3/content/selection
  8. OpenID Connect Initiation URI: Copy the URL and add to the field:
    https://ngi.englishhub.oup.com/api/edu/open/ltitool1v3/login/initiate
  9. JWK Method: Choose Public JWK URL from the dropdown menu.
  10. Public JWK URL: Copy the URL and add to the field: https://ngi.englishhub.oup.com/api/edu/open/ltitool1v3/jwks
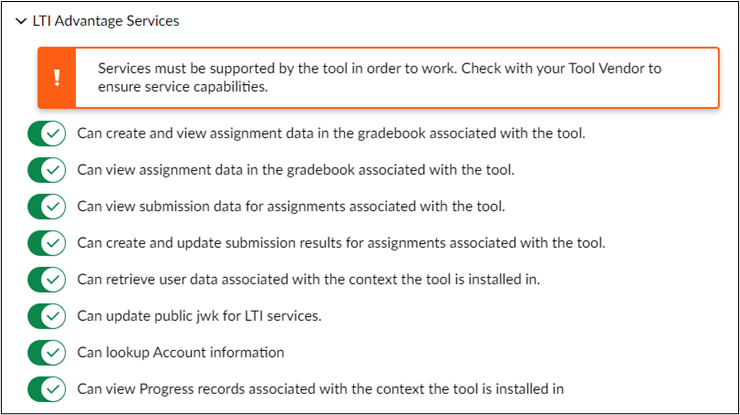
  11. Open the LTI Advantage Services heading.
    Switch all toggles on so they display a green check mark.
  12. Open the Additional Settings heading.
    Under Domain add the URL: https://ngi.englishhub.oup.com.
    Choose Public as the Privacy Level setting.
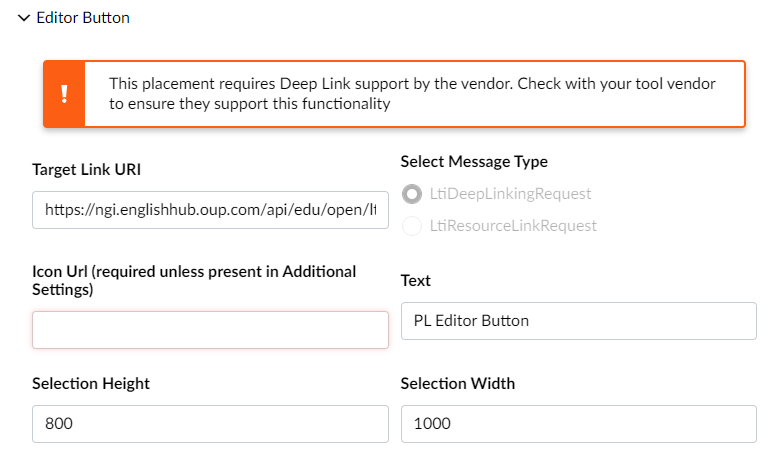
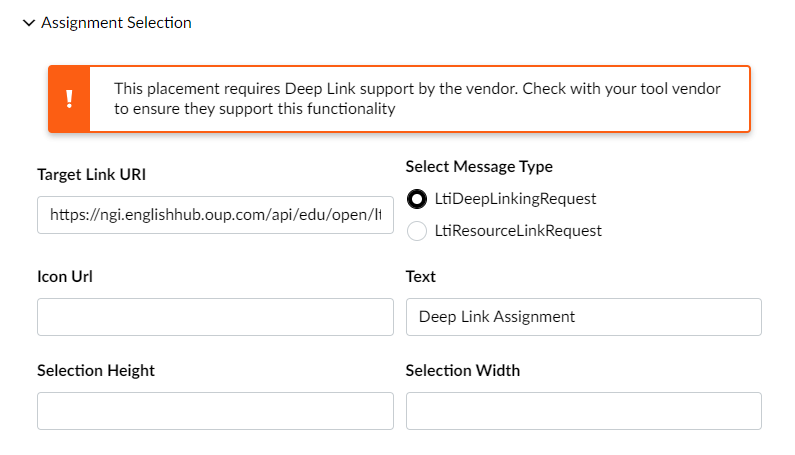
  13. Open the Placements dropdown menu.
    Choose Editor Button to add it to the Placements field.
    Choose Assignment Selection to add it to the Placements field
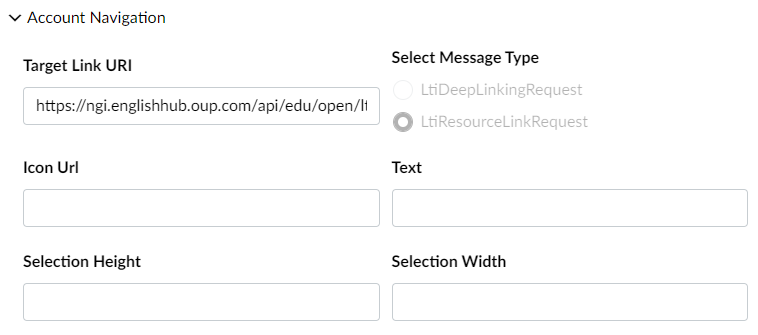
  14. Open the Account Navigation heading.
    In Target Link URI add the Content Selection URL: https://ngi.englishhub.oup.com/api/edu/open/ltitool1v3/content/selection
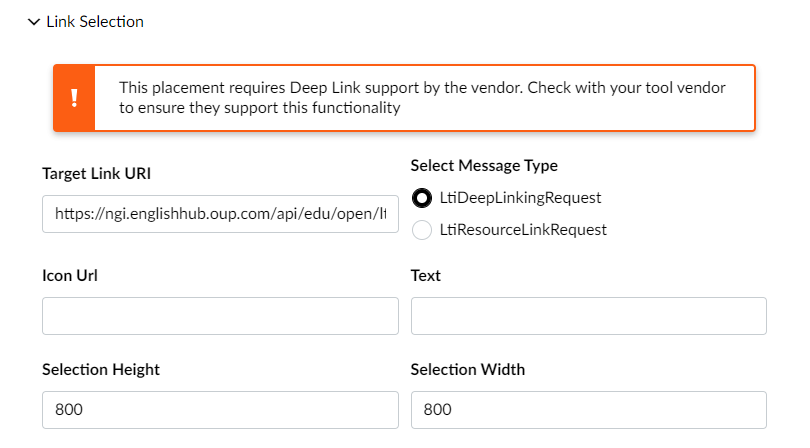
  15. Open the Link Selection heading.
    In Target Link URI add the Content Selection URL:
    https://ngi.englishhub.oup.com/api/edu/open/ltitool1v3/content/selection
    Under Select Message Type choose LtiDeepLinkingRequest
  16. Open the Editor Button heading.
    In Target Link URI add the Content Selection URL: https://ngi.englishhub.oup.com/api/edu/open/ltitool1v3/content/selection
  17. Open the Assignment Selection heading.
    In Target Link URI add the Content Selection URL:
    https://ngi.englishhub.oup.com/api/edu/open/ltitool1v3/content/selection
    Under Select Message Type choose LtiDeepLinkingRequest.
    In the Text field add a title for the tool.

Make sure there are not any spaces at the end of the URLs in the fields.

Choose Save to close the Key Settings window.

You will see the key listed in the Developer Keys list. Ensure the state is toggled ON.

Configure App in Canvas

For the next step, we suggest duplicating the current browser tab for easy copying and pasting between different sections of Canvas.

Choose Admin / Settings in the Canvas menu.

Choose Apps.

Choose View App Configurations.

Choose + App

You will see the Add App modal.

Under Configuration Type choose By Client ID in the dropdown menu.

Return to the other browser tab.

Copy the client ID from the Developer key list.

Add it to the Client ID box in the Add App modal.

Choose Submit.

In the Add app modal, choose Install.

You may see a message:

Choose Yes, Install Tool.

You will see the tool in the App list in Canvas.

Creation of the integration key and app in Canvas is now complete.

Keep both Canvas tabs open. You will need to access them later.

Configure LTI Tool in Oxford English Hub

Within the Oxford English Hub organization:

Choose LTI Deployments.

Choose Add Deployments.

You will see a side panel. Add the information below to the side panel.

In the side panel, add the following values:

  1. Issuer / Platform ID: https://canvas.instructure.com
  2. Authentication Request URL: https://canvas.instructure.com/api/lti/authorize_redirect
  3. Public keyset URL (JWKS): https://canvas.instructure.com/api/lti/security/jwks
  4. Access token URL: https://canvas.instructure.com/login/oauth2/token
  5. Add a name for the tool in Display name.

Add Values from Canvas to Tool in Hub LTI-organization

Return to the browser tab that displays the LTI External App in Canvas.

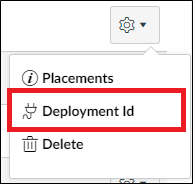
Choose the Settings icon for the App.

Choose Deployment ID.

You will see the deployment ID displayed.

  1. Copy the deployment ID and paste to Deployment ID in Hub.
  2. In the other browser tab displaying the Canvas Developer Keys list, copy the Client ID from your tool and paste it to Client ID in Hub.

Choose Add integration in the Hub side panel.

The tool has been created and deployed.

You can now assign products in your Canvas course.

Assign Tool to Canvas Course

Choose Courses in the Canvas navigation bar.

Choose your course in Canvas.

Within your course choose Modules.

Choose the + symbol to add a new item to the module.

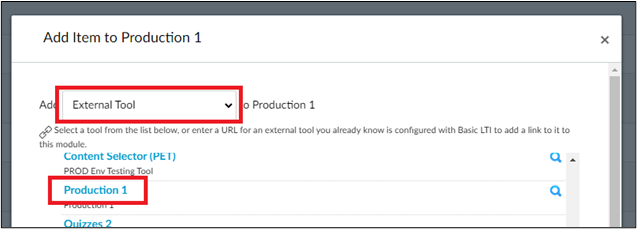
In the modal choose External Tool in the dropdown menu.

Choose your tool name in the list.

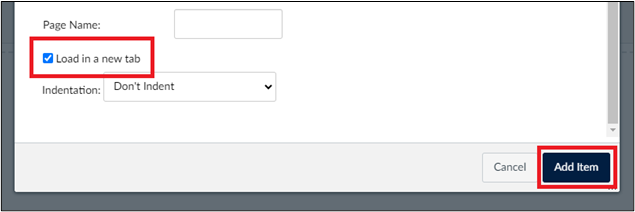
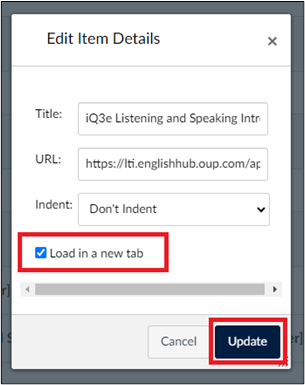
Check Load in a new tab.

Choose Add Item.

Choose Product

Having chosen your integrated tool, you will see a content selection menu of OUP products. Search for your course and choose the checkbox for the product you wish to assign to your course.

When you have chosen your product, search for Oxford English Hub if required. Access to Oxford English Hub will allow students to access course resource materials, gradebook, and assessment materials if available in your chosen course.

Choose Next.

Important: Make sure you have chosen the correct teacher or student product.

Teachers cannot launch student products.

Students cannot launch teacher products.

Check your product is correct and choose Confirm. This will close the OUP Hub content selection modal.

Close the Canvas Configure External Tool modal.

The product(s) will appear as item(s) in the module.

Open the menu for each product and choose Edit Settings.

Check Load this tool in a new tab. We recommend launching products in a new tab rather than an iframe within Canvas.

Choose Update.

Launch Products

Students or teachers will see the product launch link in the Canvas course when you have published the module.

To launch a product yourself as a teacher or administrator, it must be a teacher product and not a student product.

Clicking on the launch link will open the OUP product.

If you have created a licence pool in your Oxford English Hub organization, the student will open their product and a licence will automatically be redeemed from the pool.

(The teacher or student may have to accept Terms & Conditions on first launch.)

If you have not created a licence pool, the student or teacher will be prompted to enter an access code to be able to use the product.

They should enter their access code and choose Continue.

The product will launch.

They should check the box agreeing to the Terms and Conditions and choose Continue.

They will then be able to use the product.

Assign Hub

In the content selection menu, choose Oxford English Hub to create a launch link in your course.

Choose Next.

Choose Confirm.

Choose Save and return to course.

A launch link for Oxford English Hub will be created in your LMS course.

When a student chooses the link, Oxford English Hub will open and they will be presented with the Terms and Conditions.

They should make their age choice and agree to the Terms and Conditions.

Then choose Update my account.

The student’s account will be created in Oxford English Hub.

They can choose Get started to access Oxford English Hub.

Within Oxford English Hub students and teachers will be able to access the course content they are entitled to, such as course resources and assessment material, depending on their product.

They will also be able to access e-book, Online Practice, and assessment gradebooks.

Important:

If a student has not redeemed a licence for a product, they will not see any course material in Oxford English Hub.

If a student has redeemed a pack licence already, they will see the pack course materials available within Oxford English Hub.

If a student has redeemed an Online Practice licence, they will be able to access course Resources in Oxford English Hub.

Students and teachers cannot launch Online Practice, e-books, or Class Presentation Tools from Oxford English Hub. These products must be launched using their own launch link from the LMS.

Students and teachers can only access Oxford English Hub from their LMS. They cannot access their account or course material by signing in to Oxford English Hub directly.

Blackboard

Creating an integration requires accessing BlackBoard Developer Portal, BlackBoard LMS and Oxford English Hub. We suggest keeping these platforms open in separate windows or tabs to easily navigate between them as required.

Add Integration in Developer Portal

Access the BlackBoard Developer Portal and create an account: https://developer.blackboard.com

Log in to your account.

Choose Register a REST or LTI application.

If you have previously created integrations, then choose the + symbol and choose Manual Integration in the menu.
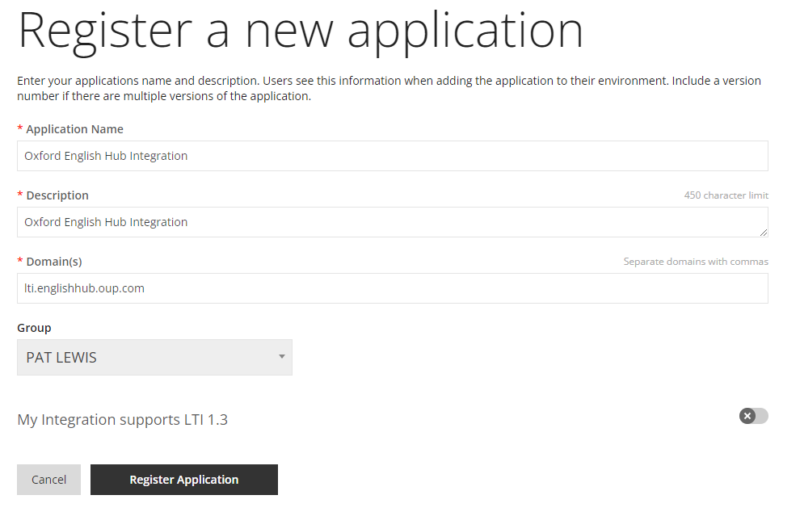
Add a name in Application Name.

Add a description in Description.

Add the domain in Domain: lti.englishhub.oup.com
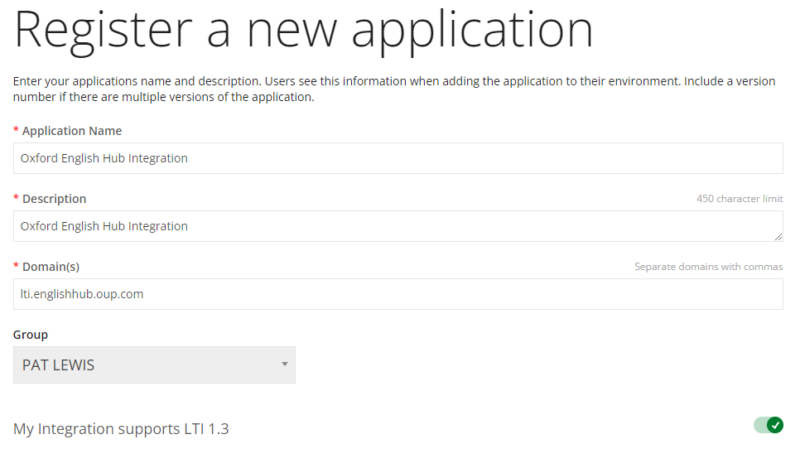
Toggle My Integration supports LTI 1.3 to on.
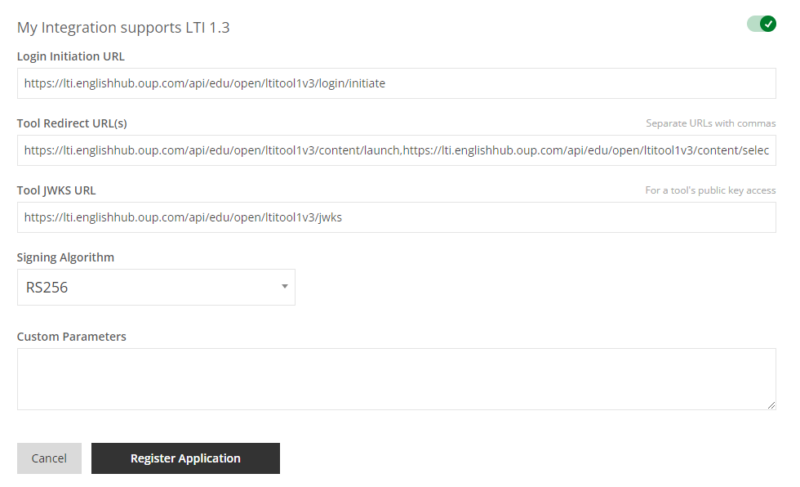
Add the Login initiation URL:

https://lti.englishhub.oup.com/api/edu/open/ltitool1v3/login/initiate

Add the Tool redirect URI(s):

https://lti.englishhub.oup.com/api/edu/open/ltitool1v3/content/launch

https://lti.englishhub.oup.com/api/edu/open/ltitool1v3/content/selection

Separate the two URLs with a comma and without a space.

Add the Tool JWKS URL:

https://lti.englishhub.oup.com/api/edu/open/ltitool1v3/jwks

Choose Register Application.
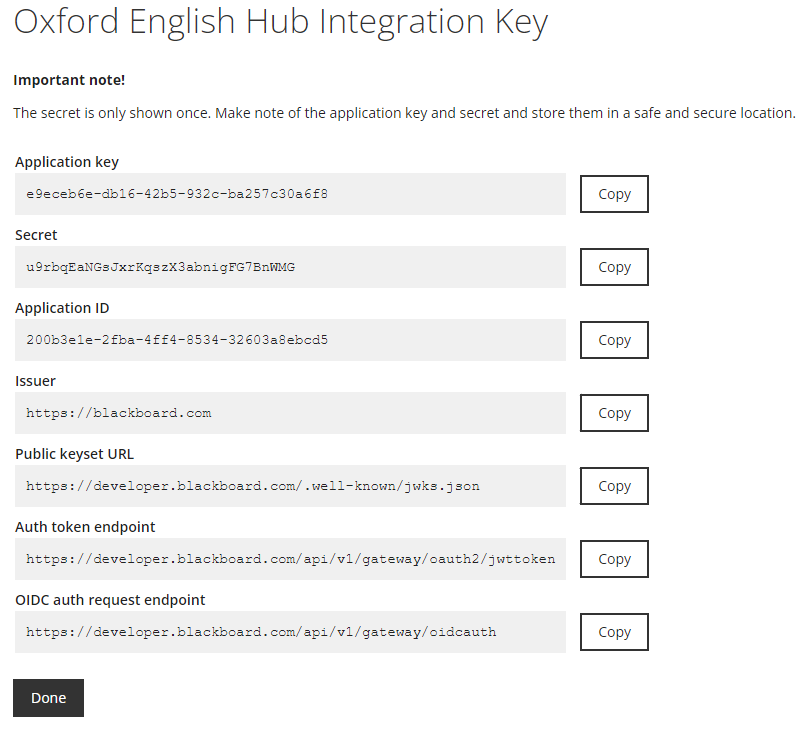
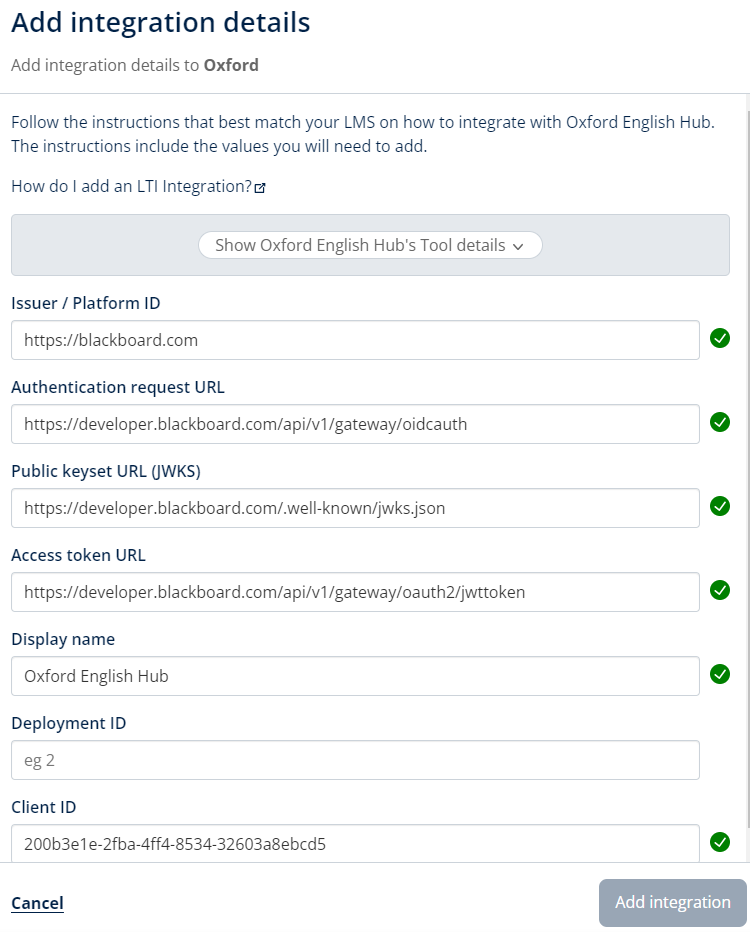
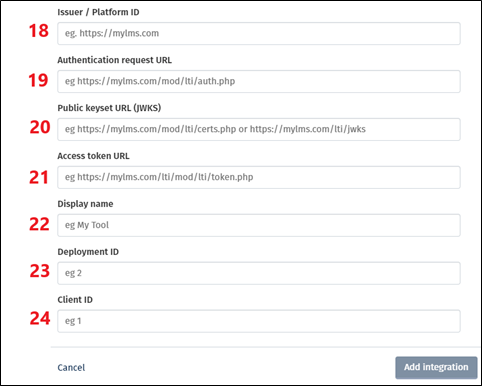
In the other browser tab, copy each of the values from BlackBoard and add them to the Oxford English Hub Tool panel.

From BlackBoard To Oxford English Hub
Application ID Client ID
Issuer Issuer / Platform ID
Public Keyset URL Public keyset URL (JWKS)
Auth token endpoint Access token URL
OIDC auth request endpoint Authentication request URL

Add a name for the tool in Display name.

In Oxford English Hub the tool integration panel should look like the above screen grab.

You will need to access BlackBoard LMS to register a tool and create a Deployment ID.

In BlackBoard, go to Administrator tools. In the administrator panel choose LTI Tool Providers.
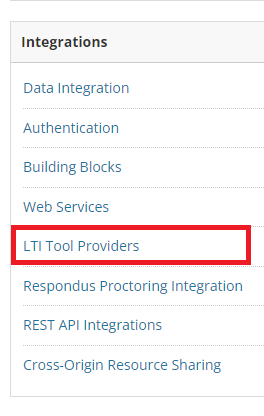
Choose Register LTI 1.3 Advantage Tool.
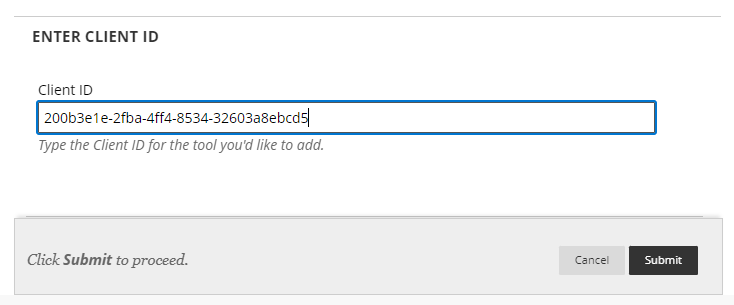
Enter the Client ID (This is Application ID from the BlackBoard panel).

Choose Submit.

The tool information will populate automatically from the developer site.

Check Tool Status to Approved.
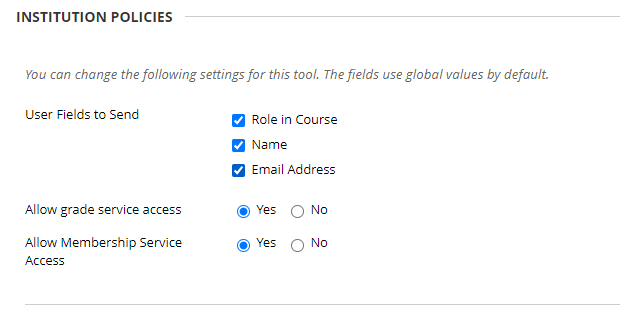
Ensure all User Fields to Send boxes are checked.

Choose Submit.

The tool will appear in the list of LTI Tool Providers.
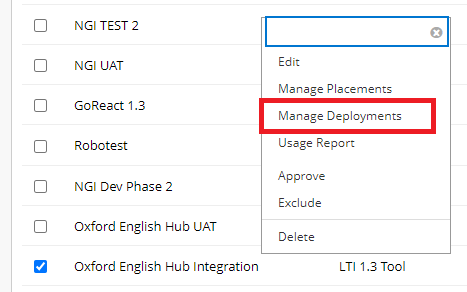
Open the menu next to the tool name and select Manage Deployments.

Copy the Default Deployment ID.

In the Oxford English Hub panel add the Deployment ID.

Choose Add integration.

Choose Done.

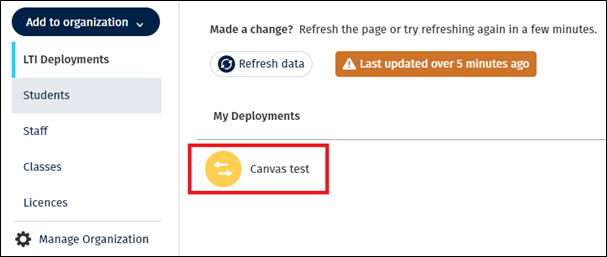
The deployment will appear under My Deployments.

In BlackBoard Developer choose Done.
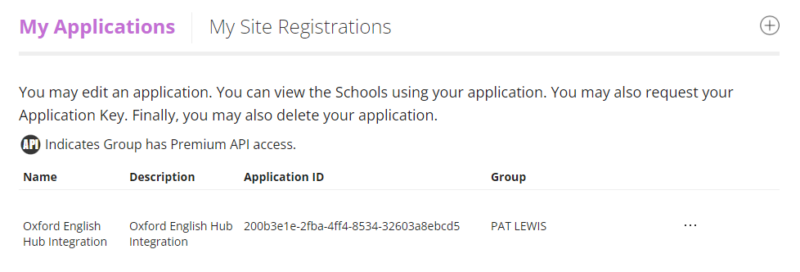
The deployment will appear under My Applications.


Add a Placement in BlackBoard

Adding a placement allows the LTI tool to be available in a BlackBoard course.

Go to the Administrator dashboard and choose LTI Tool Providers.

Select the tool and choose Manage Placements.

Choose Create a placement on the next screen.
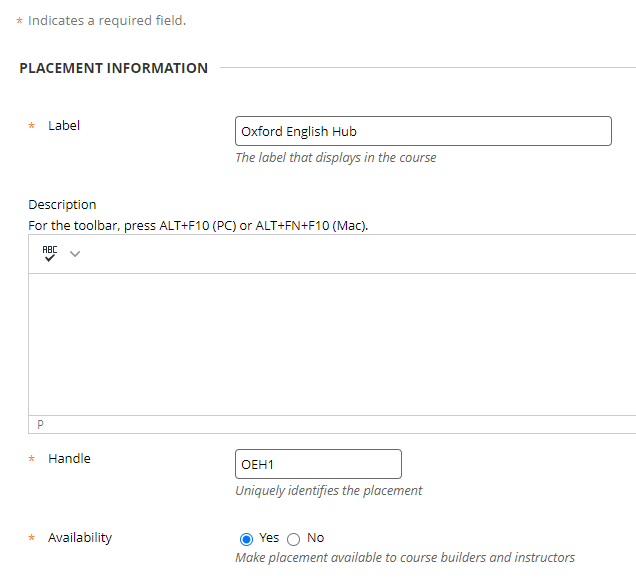
Add a label in Label.

Add a handle in Handle.

Availability should have Yes selected by default.

Under Type, Deep Linking content tool should be selected by default.

Ensure Allow student access is not selected.

Select Launch in New Window. Oxford English Hub will not open in an iFrame.

Add the URL to Target LINK URI.

https://lti.englishhub.oup.com/api/edu/open/ltitool1v3/content/selection

Choose Submit.

The placement has been created.

You will now be able to access and assign Oxford English Hub content from your BlackBoard LMS courses.


Assign yourself as a course builder to BlackBoard course
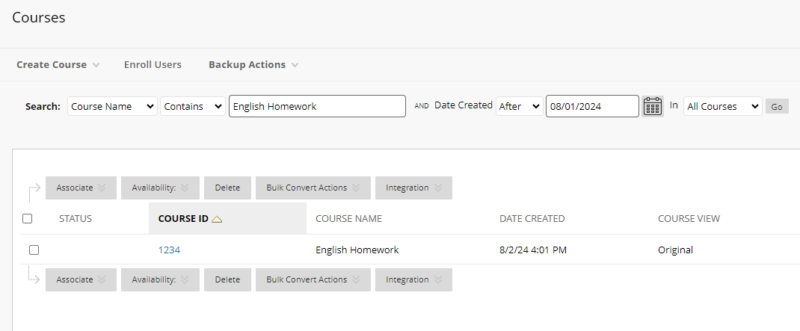
In BlackBoard Courses find the course you wish to assign the OUP product to.

Important: When using a ‘Deep Linking Content Tool’ placement type the user must be enrolled in the course for it to function.

Click in the course ID. This will display the course home page.

Under Course management choose Users and groups then Users.

Under Enroll User choose Find users to enroll.

Add your username.

In Role choose Course Builder.

Choose Submit.

You will be enrolled to the course.


Assign a product launch link to a BlackBoard course
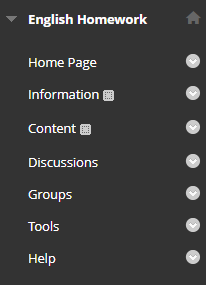
In the course navigation bar choose Content.
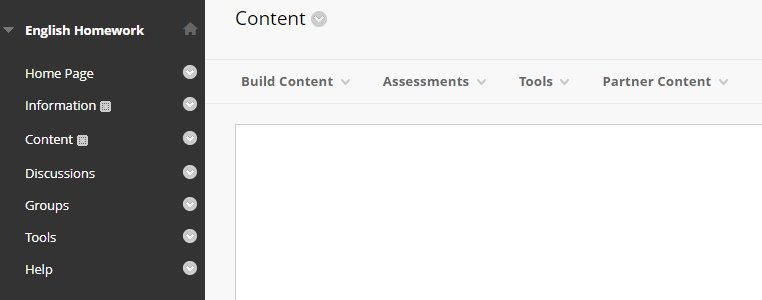
Under Build Content select the label of your course.

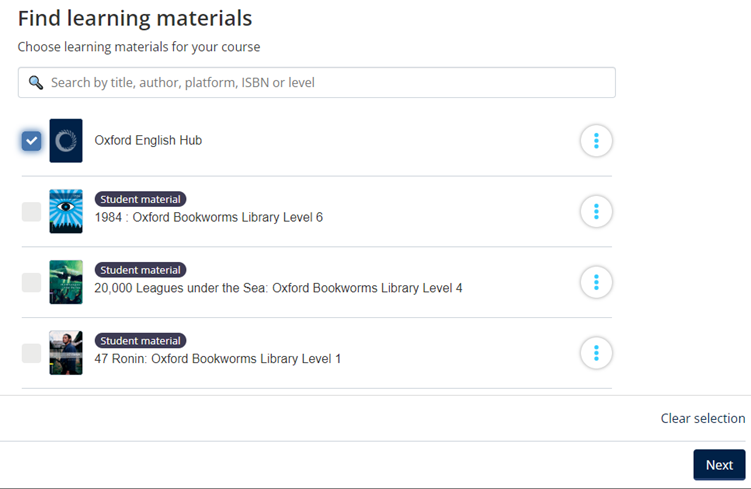
The Oxford English Hub Content Selection Menu will open.

Search for your course by product title or ISBN.

Select the product you wish to assign to your BlackBoard course.

Choose Next.

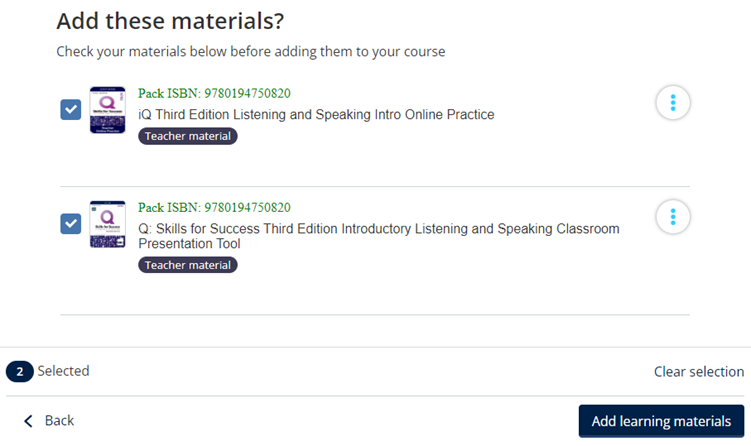
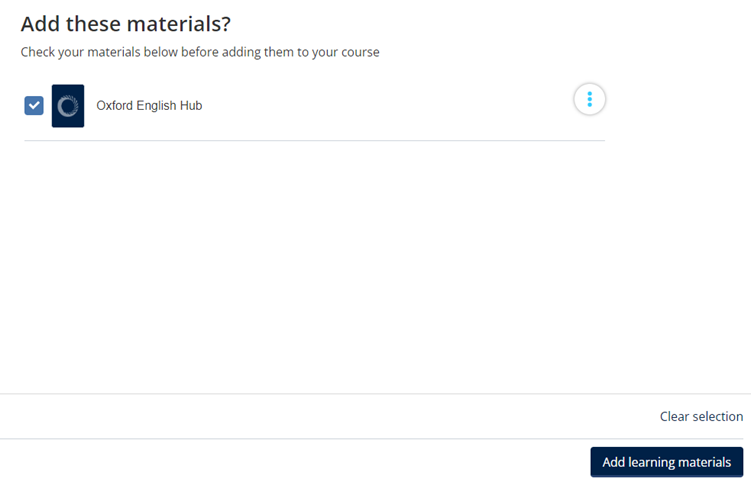
Check the materials are correct and choose Add learning materials.
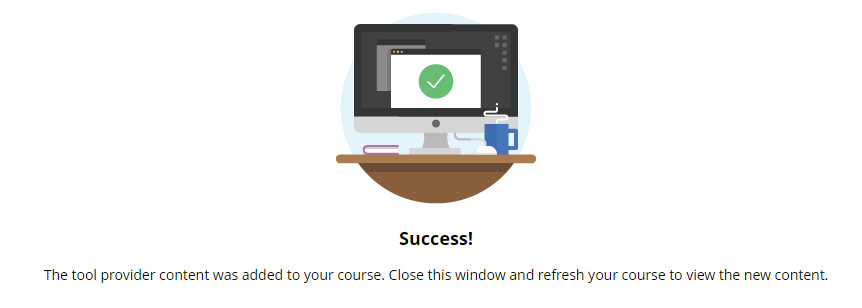
BlackBoard will display a success message.

Refresh the page of your BlackBoard. The LTI launch link will display in your course.

Teachers and students can launch their product using the link.

Important:

Teachers/instructors can only access teacher products.

Students can only access student products.

For a BlackBoard Course Builder to access products they must change their user role in their BlackBoard course to instructor or student.

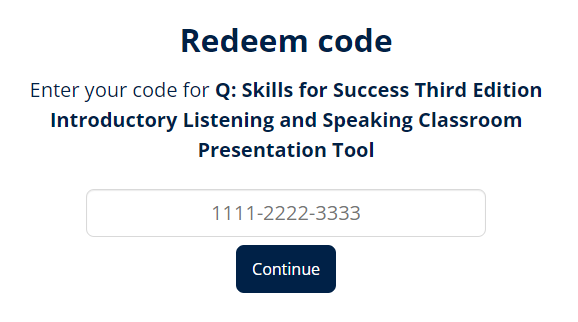
The first time a student or teacher launches a product they will be presented with a field to enter their product access code.

If a code pool has been created separately in the Oxford English Hub organisation then the access code prompt will not appear.
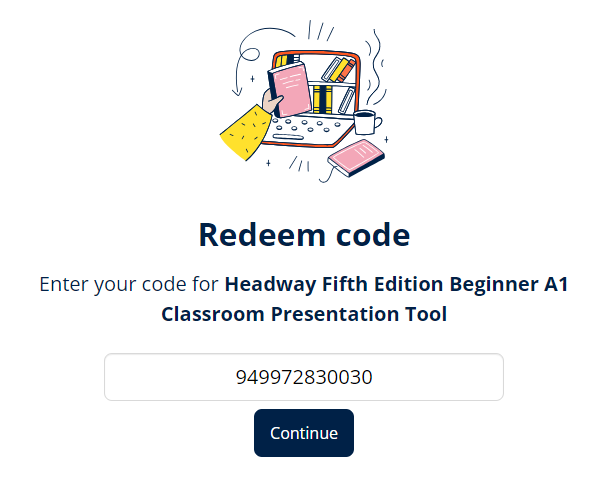
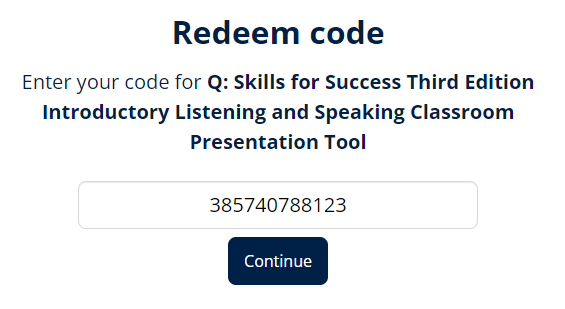
The student or instructor should enter their product access code and choose Continue.
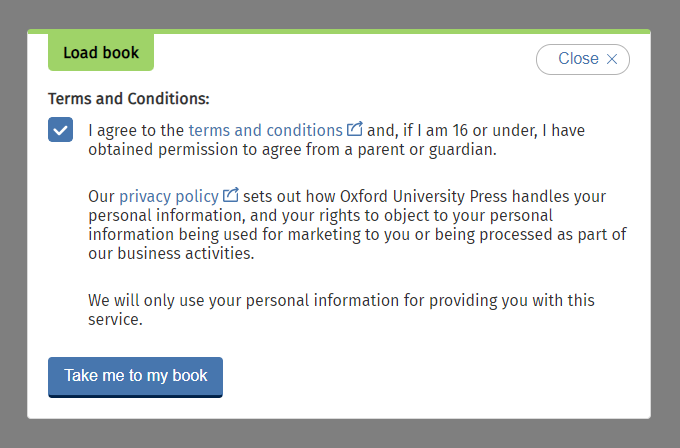
On first use some Terms & Conditions may have to be accepted.

The product can then be used.


Assign Oxford English Hub to a BlackBoard Course

You can assign a launch link to the Oxford English Hub in your BlackBoard course. Students and teachers will be able to launch the Hub to acces the Resources area, Gradebook and any Assessment material if available for your course.
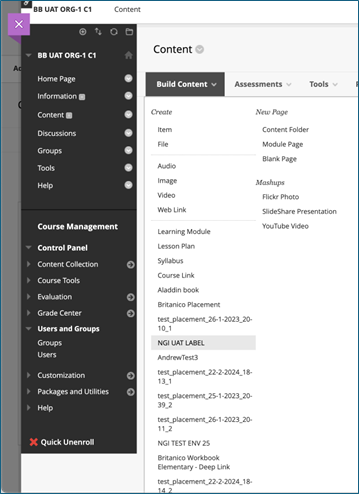
On your BlackBoard Home page choose Content in the navigation bar.

Choose Build content.

Choose the LTI tool in the menu. This will launch the OUP content selection menu.

Select the Oxford English Hub in the content selection menu.

Choose Next.

Check and choose Add learning materials.

BlackBoard will display a message confirming the Oxford English Hub has been added to your course.
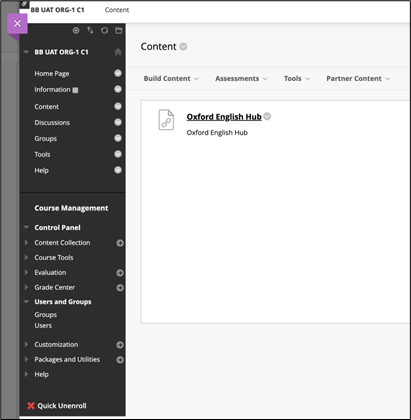
Refresh your BlackBoard page to see the link.

Click the link to launch the Oxford English Hub.
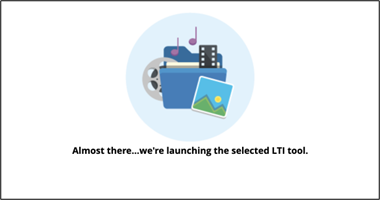
You will see a confirmation message.
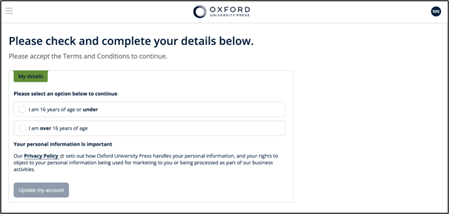
Agree to the Terms and Conditions and select an age option.
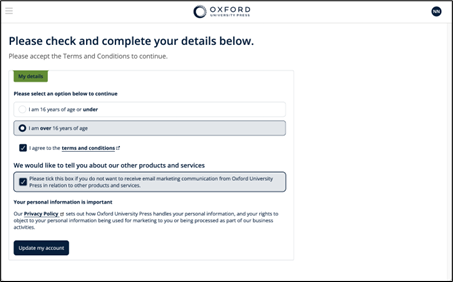
Select your marketing preference.

Choose Update my account.

You will see a message confirming your account has been created.

Choose Get Started.

Administrators, students, and teachers will be able to use Oxford English Hub to access any resources and gradebooks for products they are entitled to.

Important:

If a student has not redeemed a licence for a product, they will not see any related course materials in Oxford English Hub.

If a student has redeemed a pack licence already, they will see the pack course materials available within Oxford English Hub.

If a student has redeemed an Online Practice licence, they will be able to access course Resources in Oxford English Hub.

Students and teachers cannot launch Online Practice, e-books, or Class Presentation Tools from Oxford English Hub. These products must be launched using their own launch link from the LMS.

Students and teachers can only access Oxford English Hub from their LMS. They cannot access their account or course material by signing in to Oxford English Hub directly.

Schoology

Create a Deployment between Oxford English Hub and Schoology

Go to https://app.schoology.com/login

Log in with your administrator account.

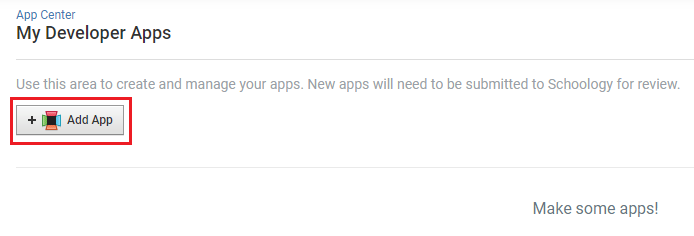
Choose App Center.

Choose My Developer Apps.

Choose Add App.

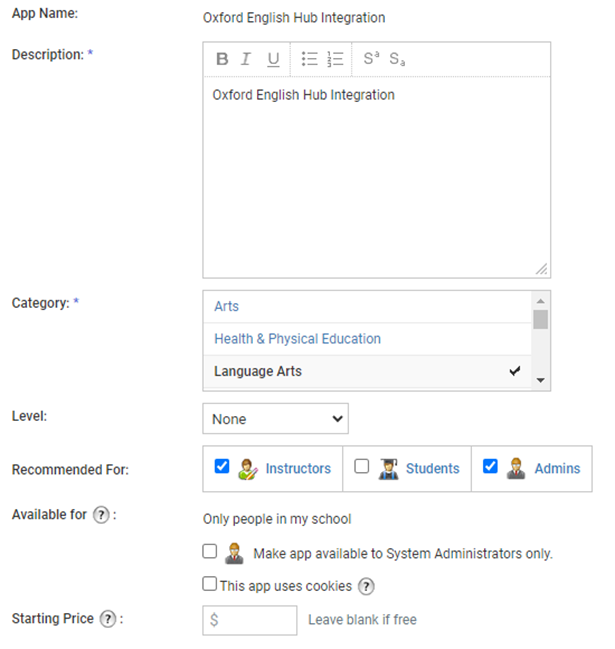
Add an App name.

Add a Description.

Choose a Category.

Select appropriate roles as Recommended For.

Choose Only available for people in my school in Available for.

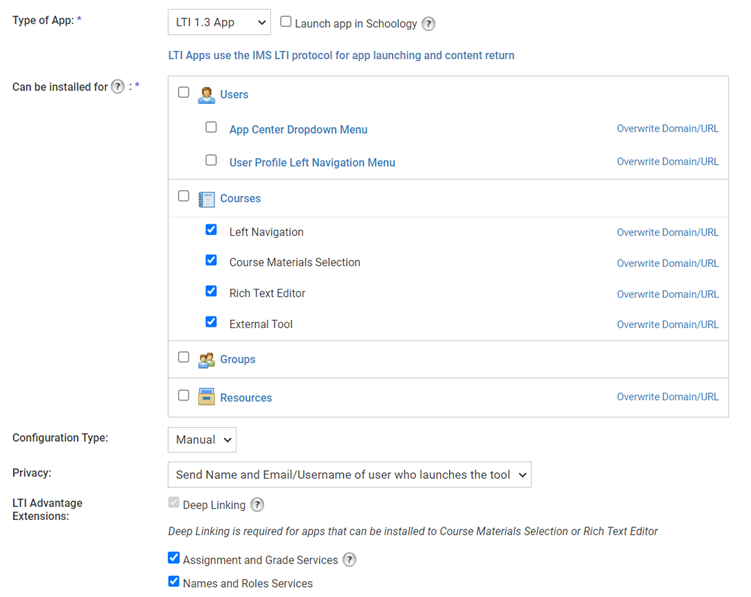
Choose LTI 1.3 App in Type of App.

Ensure Launch app in Schoology is not selected.

Select ‘Left Navigation’, ‘Course Material Selection’, ‘Rich Text Editor’, and ‘External Tool’.

Deep Linking will be selected by default.

Select Assignment and Grade Services and Names and Roles Services.

Add the below URLs to the corresponding fields. Ensure there are no spaces added at the end of the URLs. The URLs are also available to copy by clicking Show Oxford English Hub’s Tool details in the Hub tool panel.


JWKS URL

https://lti.englishhub.oup.com/api/edu/open/ltitool1v3/jwks

Domain/URL

https://lti.englishhub.oup.com/api/edu/open/ltitool1v3/content/selection

OIDC Login Init URL

https://lti.englishhub.oup.com/api/edu/open/ltitool1v3/login/initiate

Redirect URLs

https://lti.englishhub.oup.com/api/edu/open/ltitool1v3/content/launch

https://lti.englishhub.oup.com/api/edu/open/ltitool1v3/content/selection


Accept the Terms of Use.

Choose Submit.

The app has been created.

Choose Options.

Choose API info.

Copy the Client ID and add it to the Client ID field in the Oxford English Hub tool panel.

Close the Schoology API information modal.

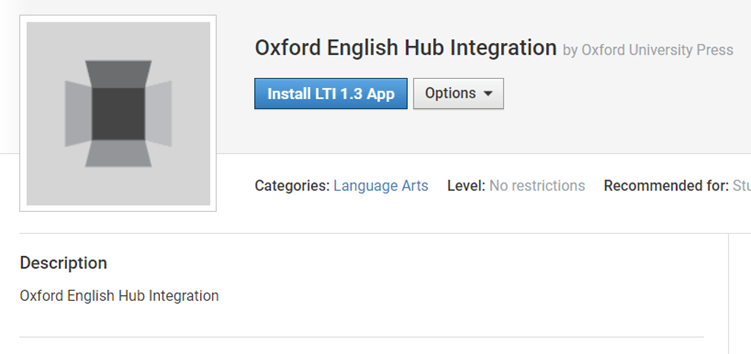
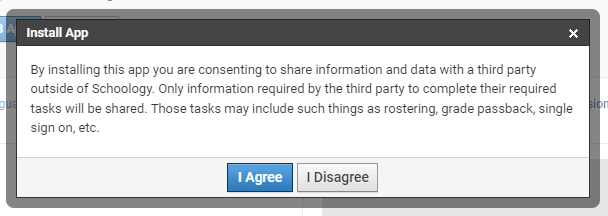
Choose Install LTI 1.3 App.

Choose I agree.

Choose Continue.

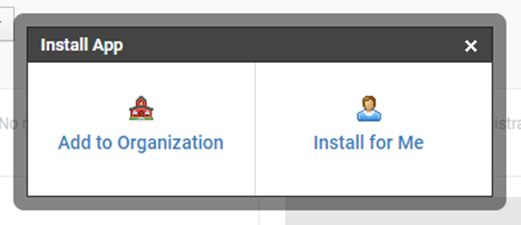
As you are an administrator choose Add to Organization.

You will see the app in the Organization apps list.

If you wish to make the app available in all courses, choose Install/Remove.

Select All courses and choose Submit.

Choose Configure.

You will see the Deployment ID displayed.

Copy the Deployment ID and add it to the Deployment ID field in the Oxford English Hub tool panel.

Add the following URLs to the Oxford English Hub tool panel:

Issuer platform ID:

https://schoology.schoology.com

Authentication request URL:

https://lti-service.svc.schoology.com/lti-service/authorize-redirect

Public keyset URL (JWKS):

https://lti-service.svc.schoology.com/lti-service/.well-known/jwks

Access token URL:

https://lti-service.svc.schoology.com/lti-service/access-token


Add a Display name.

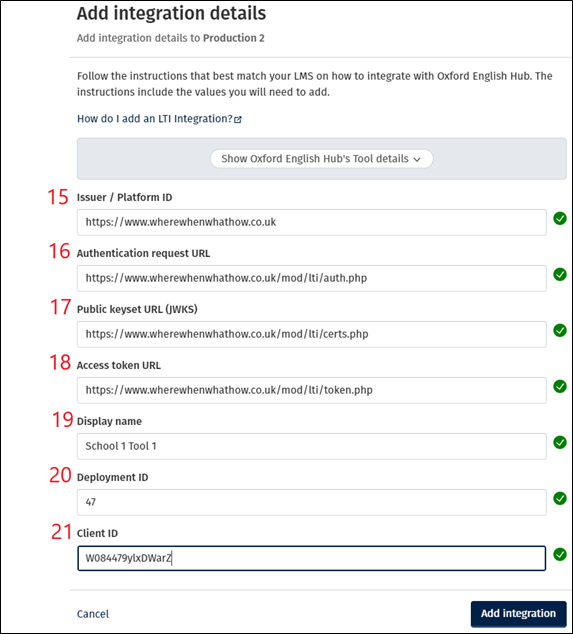
The Oxford English Hub tool panel should look like the below image.

Choose Add integration.

The deployment will display in the Oxford English Hub deployments list.

Add a Product Launch Link to a Schoology Course

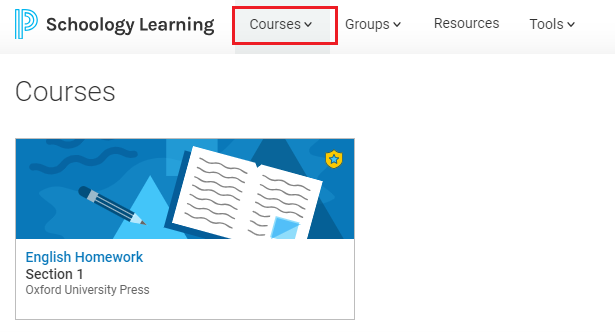
Choose Courses in the Schoology navigation bar.

Choose a course or create a new one.

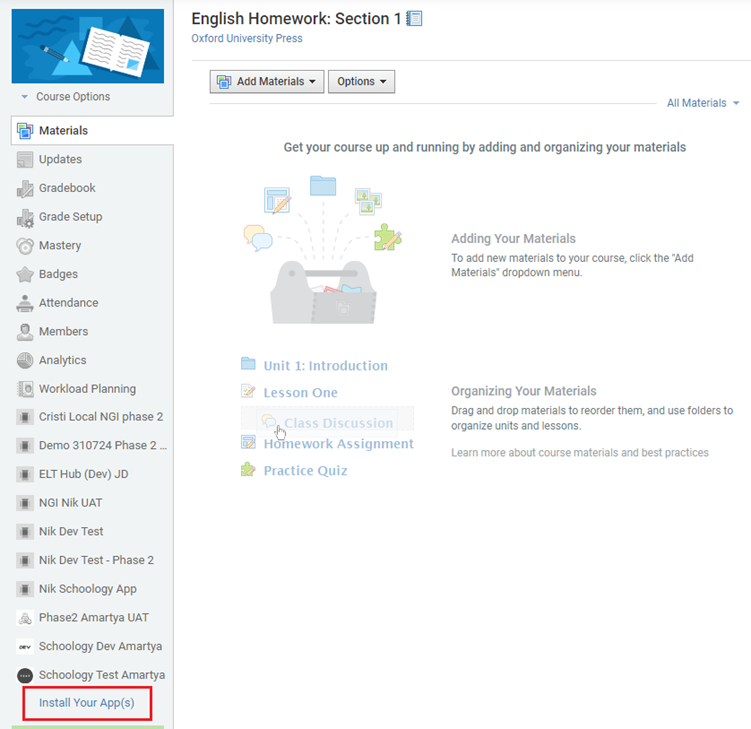
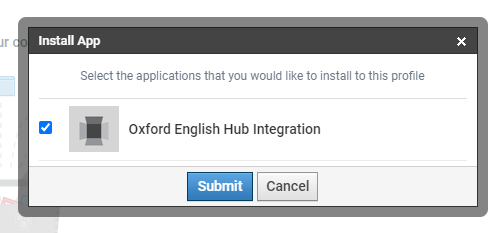
If the app has not been installed to the course, choose Install your App(s) in the left hand column.

Select the application and choose Submit.

The app will appear in the left hand column.

The app will also display in the Add Materials menu.

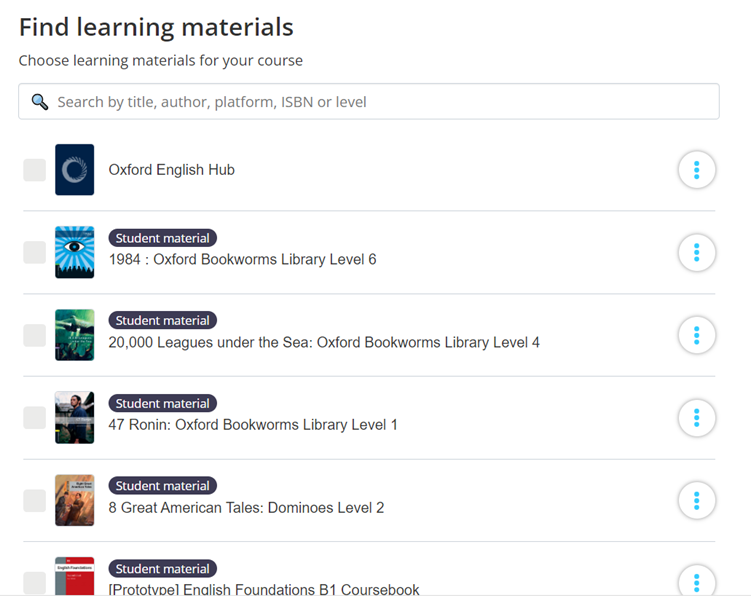
Choose the app to launch the OUP Content Selection Menu.

You can choose materials to add to your course from the Content Selection Menu.

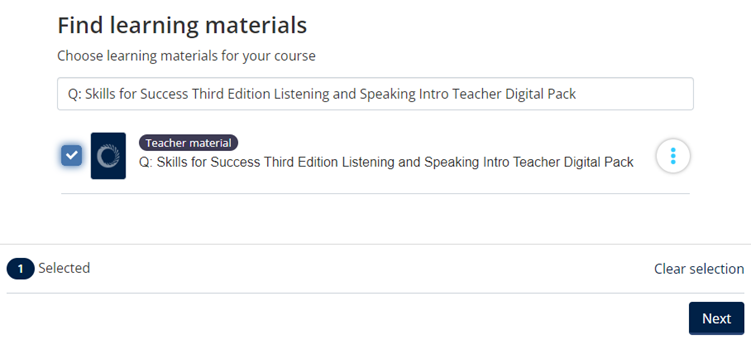
Search for the OUP product you wish to add to your course in the search bar.

Select the product.

Choose Next.

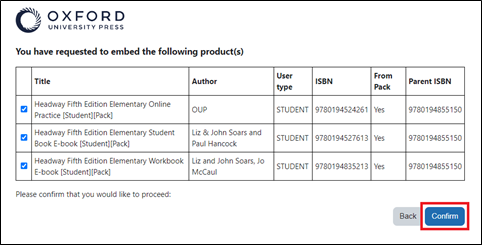
If you have chosen a pack, then the products within the pack will display.

Choose Add learning materials.

LTI launch links for each product you have chosen will be created in your Schoology course.

Clicking a link will launch the product.

When launching a product for the first time, students and teachers should enter their access code unless a licence pool has been created.

Pack codes or individual product codes can be redeemed.

Teachers and administrators must enter a teacher pack or product code and can only access teacher products.

Students must enter a student pack or product code and can only access student products.

Enter your code and choose Continue.

You will be able to access and use the product.

Assign Oxford English Hub

In the content selection menu, choose Oxford English Hub to create a launch link in your course.

Choose Next.

Choose Add learning materials.

A launch link for Oxford English Hub will be created in your LMS course.

When a student chooses the link, Oxford English Hub will open and they will be presented with the Terms and Conditions.

They should make their age choice and agree to the Terms and Conditions.

Then choose Update my account.

Within Oxford English Hub students and teachers will be able to access the course content they are entitled to such as course resources and assessment material, depending on their product.

They will also be able to access e-book, Online Practice and assessment gradebooks.

Important:

If a student has not redeemed a licence for a product, they will not see any related course materials in Oxford English Hub.

If a student has redeemed a pack licence already, they will see the pack course materials available within Oxford English Hub.

If a student has redeemed an Online Practice licence, they will be able to access course Resources in Oxford English Hub.

Students and teachers cannot launch Online Practice, e-books, or Class Presentation Tools from Oxford English Hub. These products must be launched using their own launch link from the LMS.

Students and teachers can only access Oxford English Hub from their LMS. They cannot access their account or course material by signing in to Oxford English Hub directly.
Manage your deployment

In this section:

Create a licence pool

If you create a licence pool in your Hub organization, each time a student or teacher launches a product for the first time, a licence will be redeemed from the pool. If a licence pool is not created then teachers and students will be prompted to enter their product or pack access code to access the product(s).  

To create a licence pool within your Hub organization choose Licences.  

Choose Add licences.   

In the Add licences side panel, choose Import access codes

Follow the instructions to upload a TXT file of product or pack access codes. Drag the file into the frame or choose to upload from a folder on your computer. 

An email will be sent to you to confirm the upload is complete. 

Choose Done

You will see the number of licences available in the pool next to the product title. 

Each time a product is launched, a licence will be redeemed from the pool. The number of licences available and used will display next to the product title. 

Teachers and students have different access codes for the same product such as Online Practice.

Add a new deployment

Choose LTI Deployments.  

Choose Add

Add a name for the deployment in Display name

Add an ID for the deployment in Deployment ID

Add the client ID in Client ID

Choose Add deployment

When you have chosen Add deployment a success message will display. Choose Done.  

The new deployment will display under My Deployments

You must complete the deployment with your LMS following the previous steps for your LMS above.

Edit a deployment

To edit a deployment, select the deployment and choose Edit deployment. 

You can edit the deployment display name or choose Edit Shared Values to edit the deployment values.  

These values are shared by all deployments within your organization’s tool. If you make a change here it will affect all other deployments in your organization.

Choose Save to save your changes. 

Archive a deployment

If you wish to remove a deployment no longer in use, you can choose to archive it. Choose Archive Deployment in the deployment menu. 

Archiving a deployment is irreversible.

In the side panel choose Archive Deployment

Once a deployment is archived it cannot be undone.

You will see a message confirming the deployment has been archived. Choose Done to return to your LTI deployments page. 

Frequently asked questions

Can I change roles in my LMS and launch a product?

No. If you have accessed products in Oxford English Hub/OLB/Online Practice as a teacher from your LMS, you must keep the same role in the LMS when you launch products in future. If you change your LMS role to student you will not be able to access your OUP products. The same goes for students who switch to a different role.

Can I un-archive a deployment?

No. Once a deployment is archived it cannot be undone.

Can I edit a deployment?

Yes. The deployment values are shared by all deployments within your organization’s tool. If you make a change here it will affect all other deployments in your organization.

Do teachers and students have different access codes for their products?

Teachers and students have different access codes for the same product.

Can students launch teacher products?

LMS users using a student account cannot launch teacher products. LMS users using teacher accounts cannot launch teacher products.

Can I assign packs and products?

You can choose individual products e.g. e-book, Online Practice, or a pack of products if available. Choosing a pack will create launch links for all the product components within the pack.

Should teachers and students redeem product or pack access codes?

Pack access codes are required to be redeemed to access component products from a course pack. Individual products require their own product access code.

Can students and teachers see course material in Oxford English Hub?

If a student or teacher has redeemed a licence for a pack or product they will see any associated course material for that product in Oxford English Hub e.g. Resources or Assessment materials.

Can students and teachers launch Online Practice, CPT and e-books from Oxford English Hub?

Students and teachers cannot launch Online Practice, e-books or Class Presentation Tools from Oxford English Hub. These products must be launched using their own launch link from the LMS.

Can student and teachers access Oxford English Hub by signing in to it directly?

Students and teachers can only access Oxford English Hub from their LMS. They cannot access their account or course material by signing in to Oxford English Hub directly.
Can students and teachers manage their accounts and classes from Oxford English Hub?

No. Account and class management must be done from the LMS. This is not possible in the integrated Oxford English Hub.
Need help?